
Kate's April DT Projects
April is one of my favourite months of the year because it is not only Easter (yummy chocolate & family time) but it is also my birthday month. The April kit the DT received was packed with gorgeous colours featuring the new and very versatile Little Yellow Bicycle (LYB) Paradise patterned papers. We were also very fortunate to showcase the beautiful intricately designed WOW chipboard. You will be very impressed if you make a WOW purchase (and Pages 2 Scrap have a HEAP of this in store), because it is fantastic quality and chipboard to suit any theme.
Untitled
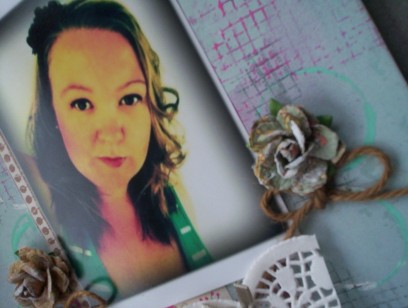
I wanted to do a layout of myself since it is my birthday month after all!!
- You don't always need to include a title on your pages. You will know in yourself whether or not a title is 'needed' on your pages. Sometimes the photo tells the story on it's own without an obvious title. Sometimes a layout looks great to look at without the addition of a title. The way I see it, if you can by greeting cards with a 'blank message' inside, then surely you can produce a layout without a title.
- To make the bunting, I tied a bow at each end of my string and hot glued each bow to either side of the photo. In addition, I hot glued my doily 'triangles' along the string as well.
- I had my photo printed like that!! There are many applications you can use on iphones and android phones these days to edit your photos. I simply used a program to edit my photo and had it printed out.
-Simple strips of patterned paper were used to create the background behind my photo. Kind of like a matt! One of the pieces I punched using a Martha Stewart Border Punch I purchased from Pages 2 Scrap.
- Again, lots of paint, mist and stamping for my backgrounds. You can find a range of Kaiser paint, Glimmermist and stamps at Pages 2 Scrap. That is where I got all mine from!
- Save empty toilet roll cores!! I use them to dip into paint to create 'circles' on my pages.
Materials:
LYB Paradise patterned paper- Teal, too, simple pleasures, born to be wild.
Prima flowers
May arts burlap string
paper doily
Martha Steward ribbons
Kaisercraft paint, stamps
Glimmermist

Follow Me
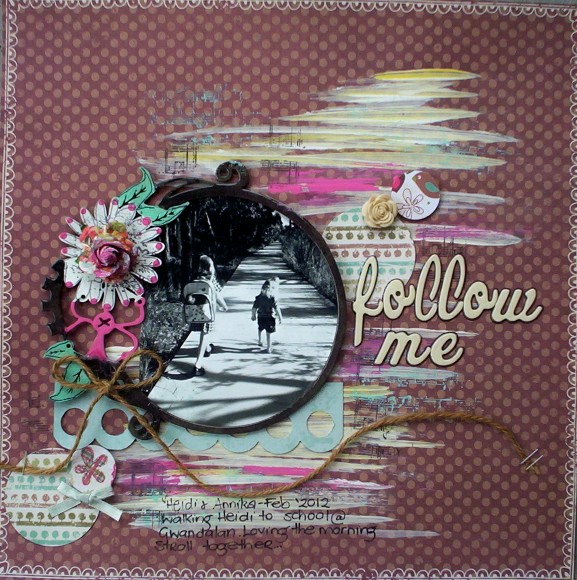
I really wanted to draw the eye in on this photo of my daughters walking to school. But I also wanted to create movement on my page like we are 'following' them up the path. I thought the WOW chipboard ALCHEMY CIRCLE FRAME LARGE would be perfect to frame this photo. The flowers and leaves on the chipboard really added that nature feel to represent the nature trail footpath we were walking along that morning. The painted base of my layout was to represent the 'path' they were on.
- Patterned paper can be a great base for a layout instead of cardstock. I always find papers without pictures on it and just a patterned work well. Especially this piece "Earthy Dots" with the border printed on it. It really helps to frame the layout.
- I used normal acrylic paint to paint my chipboard, I also used Glimmer Glam, Glimmer Glaze and covered the majority of my chipboard with Glossy Accents. I glued a Prima flower to the centre of the flower in the chipboard, just to add dimension to that 'cluster'.
- To add to the circular theme of the WOW chipboard frame, I used my circle punches to punch out patterned paper which I adhered to my layout with both DS tape and foam adhesive.
Materials:
LYB Paradise- Earthy dots, petite pompoms, simple pleasures, born to be wild.
ALCHEMY CIRCLE FRAME LARGE WOW chipboard
Martha Stewart Ribbons
Kaiser Resin Blossoms
May Arts Burlap String
staples
Kaiser paint, stamps
Glimmer glam, Glimmer glaze
American Crafts Thickers
Prima flower
Glossy Accents

Keep you forever
When I realised my daughter was wearing the same colour dress as this pretty Bazzil cardstock I just HAD to coordinate it all together to make this layout! The pretty images on the patterned papers in the LYB Paradise collection were perfect for outdoor photos as well, so I wanted to incorporate a natural, floral type 'spray' up the side of my photo.
- I traced around a dinner plate to get the 'flower' type shape of the patterned paper. You never know what shaped objects in your kitchen or even your house that you can use as a stencil to trace around and then cut out for your layouts.
- Once again, that toilet paper roll core came in handy for stamping on my Bazzil base. I find coloured cardstock (not neutrals) can be a bit daunting to use sometimes, however you can easily tone it down by adding texture with paints, misting and masks, stamping and even teaming it up like I have, with a busy patterned paper can help.
- Arrange all your clusters first before adhering it to your page. Sometimes once you get it stuck down first, it might not look right or you might want to add something extra to it. So lay it all out first then start sticking!
- Outline your alphas to make them 'pop off the page'.
- I glued my resin blossom to my button to create a whole new embellishment.
Materials:
Bazzil Intense Pink
LYB Paradise Patterned paper
Kaisercraft stamps (background and leaves), paint
Glimmermist
Prima flowers
American Craft Thickers
Jenni Bowlin Vintage Button
Jenni Bowlin Rhinestone Bow Cream
Kaiser Resin Blossom


Thank you so much for dropping by, I hope you feel a little inspired by these fabulous products. Make sure you check out the DT inspiration in store.
~Kate


Really nicely done Kate! I specially like the way you've done the paint on the "Follow Me" LO! It really made that paper come alive! And I love how you frame the subject matter too! = )
ReplyDeleteI really like the Keep you forever LO, the colours and textures compliment this piece of work :-)
ReplyDelete