Monday, November 26, 2012

Christmas Card Caddy Class - Helen Cooke


30th Nov - Christmas Card Caddy  - Helen Cooke
Friday – 10:30am-1:30pm.

$30 (includes kit).
Perfect as a gift or to keep yourself, create this sweet Christmas card caddy.
Complete with cards, tags and a notebook this amazing little caddy folds into a neat little box.

Friday, November 23, 2012

Page 2 Girls DT Projects - November - Leonie


Hello all, Leonie here with this month's DT inspiration using the beautiful BasicGrey Aspen Frost collection.

This collection is festive but subtle, and really versatile for lots of different styles of layouts. I really like the 'Tin Solider' vintage style ornament paper and the wax seals, but my new fave is the velvet rub-ons. I LOVED using these, I think they are my new favourite product! I liked them so much that I even used the negative flocked bits that you would normally throw away. They take a bit more rubbing than regular rub-ons but the texture they add to your layouts is fantastic.


For my first layout I used a Heidi Swapp mask and copper GlimmerMist on some plain red cardstock to give it a bit of sparkle, then added some blooms and embellishments from my kit and a few simple flowers from my stash. I love these colours together - aqua and red - they work so well for any layout, not just for Christmas.


This 'Cherried Noses' paper is one of those that you have to buy two of because both sides are so pretty, but for this doggy layout I've gone with the music side and roughed it up with a bit of stamping. You can see the flocked red sheet behind the photos - this is the leftover negative part after I used all the rub-ons. The flourish is from Words or Whatever with the addition of some copper embossing powder. And there's a bit of red Kaiser bling in there too.


Do you have a 'nice shelf' at Christmas? A special place you put all your breakable things up away from the kids? I thought this would make a good topic to journal about, and kept this layout simple with the flocked rub-ons taking centre stage. I wouldn't have picked grass green and aqua as colours that would work together but the different tones of red really bring them together and makes this collection Christmassy without being too in-your-face.


This 'Covered Lashes' paper was really sweet to work with too, there was some lovely white Christmas flowers and Aspen Frost cardstock stickers in my kit which I've used under and around the photo, the lightbulb is from Prima and I made the blue netting flower using Glubers glue circles. The wax seals from the collection are really sweet too! These would be a lovely addition to your extra special Christmas cards.


Last up, I've been planning to alter this clipboard for a while now, it's a little A5 size one which I've decoupaged with vintage paper and embellished with Aspen Frost embellies and alphas, and that gorgeous red stitched ribbon from Pages 2 Scrap.

It's really putting me in a festive mood doing all these great Christmas projects. Are you making handmade gifts or cards this year? What a great excuse to pop in to Pages 2 Scrap and do some SHOPPING!

Stay crafty!
Leonie
xo

Thursday, November 22, 2012

24/11/12 - "Me By Prima"- Kim Wyatt

24th Nov - “Me By Prima”- Scrapbook Page - Kim Wyatt
Saturday – 3:30pm–5:30pm
$30 (includes kit).

If you love using “Prima”, then this page is for you!
We use pages from the “Almanac” collection, Along with co-ordinating flowers and long steam vines as well as some of the “Prima” packaging from the product ( let’s not waste a thing !).
A very feminine page to complement a photo of you.


Tuesday, November 20, 2012

24/11/12 - Copic Advanced Marathon - Dawn Lewis

24th Nov - Copic Advanced Marathon - Dawn Lewis

Saturday –10am –3pm.
$60.00 (includes 6 Ciao Markers of your choice).
It's time for the long-awaited Advanced Copic marathon class! 
We will be doing some amazing new hair techniques including dip-dye hair, corkscrew curls, funky coloured streaks and unblended hair. 
We will also be creating dotted effects and learning to colour water and other see-through goodies like glass, and a special way to tone down some of those brighter colours in your collection. 
Remember to bring all your Copic markers with you on the day!


Sunday, November 18, 2012

24/11/12 - Scrap & Pizza Night

 24th Nov -  Last Scrap and Pizza Night.
Saturday– 6pm–Midnight.
$20.00.


Come and get creative with us at our monthly Open Scrap Night, held on the last Saturday night of every month.

Bring your friends and enjoy a fun night of creativity whether you are a scrapbooker, card maker, off the page creator or like to dabble in mixed media.

There will be pizza & a soft drink for dinner included in the entry price.

This is a great opportunity to see what’s new, and ask staff about all the latest products in person!

We welcome all of you who have been before and would love to see some new faces and don’t forget that the store is open for your convenience during the night.

Friday, November 16, 2012

Page 2 Girls - DT project - November - Sam

Hi Everyone !

November is such a wonderful time of the year ....Sunny , bright and all the lovely flowers are blooming .

This months papers where bright and colourful as well . The range I worked with this month was the Basic Grey range "Soleil".

This range is really fun and funky with hues of pink , mandarin and purple . It would suit a beach layout , girl layout or even holiday photos.

This month I chose to create a canvas to showcase a very special photo of my sister and myself. It was taken on holidays on the coast so I thought this range with it's bight colours would frame it beautifully.


I started with a 12x12 canvas and weaved Washi tape in one corner . This technique is a little tricky but with some Patience the end result adds interest and Texture.


I picked the brightest and most interesting parts of the papers, tore them and adhered them with Multi Medium in matte.

With a sponge brush I applied some Jo Sonia opal dust paint to give it some bling.

Rubbing some Inka Gold in silver on the edge of the canvas gives it definition.

To finish of the brackground I gave the whole canvas a coat of multi medium to seal and protect it.


Hessian adds texture as a matte for my photo as well as an old shabby chic photo frame that i recycled and finally a piece of book text completes rustic look.

I used 450 Glue to adhere the frame as it is fast drying and creates a strong bond.


I absolutely love the tubes of flowers from Prima and was so happy to finally be doing a layout bright enough to to mix and layer them.

 I also added loops of Hessian thread and ribbon, rubbed a little inka gold in silver on the edges of the flowers to tie them in to piece and added Kaiser Sparklettes to the center of each flower.


The bunting was made out of mini tags edged in inka gold and washi tape.

I used the letters from the collection to add my saying and pinned the bunting to some string using Tim Holtz Mini Safety pins.

Some heart shaped brads anchor the string to the canvas......

and there you have it ! A bright and colourful summer canvas to showcase your wonderful memories !


Hope this has inspired you to have a go at creating your own canvas!

thank you for stopping by !!!


Wednesday, November 14, 2012

17/11/12 - "Father/Dad"- Scrapbook Page - Kim Wyatt


17th Nov - “Father/Dad”- Scrapbook Page - Kim Wyatt
Saturday – 1pm–3pm.
$30 (includes kit).
Be sure to get a great pic of your dad for this layout for this layout!
We will use the Basic Grey collection – “Clippings” to Create a masculine page. Using Tim Holtz elements, an edge punch and printed chipboard dies.
This layout will showcase your Dad perfectly.

Monday, November 12, 2012

17/11/12 - "Me"- Scrapbook Page - Tracey Henly

17th Nov - “Me”- Scrapbook Page. - Tracey Henly
Saturday – 10am–12pm.
$30 (includes kit).
In this stunning Layout class you will Learn the art of heat embossing with thick embossing powders.
Using the Lovely pages from Webster’s you will also learn to get the most out of your beautiful pages with a 3D paper tole effect background.

Friday, November 9, 2012

Pages2Girls DT Projects - November - Karen McLaughlin


Hi everyone, it's Karen here sharing a couple of layouts I've done using the gorgeous new Christmas collection from Basic Grey called Aspen Frost.  The colours used in this range are traditional red and greens  with the added colour of aqua.

First up I have used four different punches to create this page.  The wordlet is a Words or Whatever which as you know P2S have a great stock of. You can even have personalised chipboard should you require that something special.  P2S also have a great selection of flowers which is great as I can't seem to do a page without flowers.

The title seemed appropriate to the photo as my daughter since the age of five had been asking for a dog. 


Next, I have created this layout again using the Aspen Frost collection.  I also used a Fantasy Round Overlay from Twiddlebitz.    I covered it first with texture paste, then painted it white then added kindy glitz (chrystalina) and then tied bits of ribbon around the overlay.  Under the snowflake stickers I gathered some ribbon.

It is a family tradition that on Christmas morning we walk along the beach with our Christmas hats on.


Well, that's it from me I hope I have given you some inspiration. 

Thanks for looking.

Karen

Papers used:

Tin Soldier
Cherried Noses
Covered Lashes
Element Stickers
Alphabet Stickers

Wednesday, November 7, 2012

10/11/12 - "Family Tree"- BTP Project - Kim Wyatt

10th Nov - “Family Tree”- Beyond The Page - Kim Wyatt
Saturday – 10am–2pm.
$35 (includes kit).


This “Beyond The Page” project will take your scrapping to a new level.
 You can personalise this tree with a treasured keepsake if you wish.
 A perfect way to display the ones who are near and dear to you.


Tuesday, November 6, 2012

08/11/12 - "Smile"- Scrapbook Page - Tracey henly

8th Nov - “Smile”- Scrapbook Page - Tracey Henly
Thursday – 10am–12pm.
$30 (includes kit).

Join Tracey as she guides you though this stunning October Afternoon Page.
 Featuring papers from the “Woodland Park” Collection,
you will learn how to layer using paper and chipboard, and use floral die cuts to create eye catching 3D flowers.


Friday, October 19, 2012

Page 2 Girls DT Projects - October - Leonie


Hello all, I've got a bumper crop of DT projects to share for this month, using the very bright and happy Kaisercraft Mint Twist collection available at Pages 2 Scrap. This range is surprisingly versatile and is perfect for both your daggy, garishly bright childhood photos (see exhibit A below) and for more subtle, refined layouts and OTP projects - you really can use the collection in lots of ways.

First up, I have scrapped a pic of my little bro in this super bright layout using a lot of layered tags and the cute pennant-shaped alphas to spell 'elf'. I love this background 'Rudolf' paper but use it sparingly if you're prone to seizures! It sure is bright! Makes me crave candy canes though...


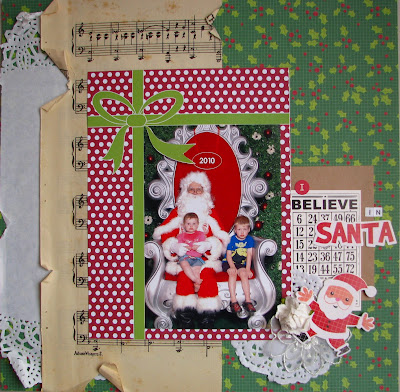
Next up, a simple layout to complement a Santa photo - the little Santa die cut adds a bit of fun, and I have just added some vintage sheet music and doilies to break up the background, and a Kaisercraft bingo card.


Next is a super simple card - I've used a 1" circle punch to punch two circles for each ornament, then just folded them in the middle to create a 3D effect. A bit of velvet ribbon and a rub-on sentiment from the kit and you've got a very easy to make yet striking Christmas card!


For this little kraft gift bag, I wanted to use the sweet die-cut stockings and washi tape to make it a bit more festive. The alphas are Thickers and I've used red and green washi tapes wrapped around the handles, and a Naughty or Nice tag from the Mint Twist collection.


Next, I've created a small altered art canvas using the Mint Twist collection in a more subtle way. I've stamped the background and used some small strips of striped paper to create a base layer, then added impasto medium, ink, glimmer mist, Kaisercraft bling, beads, paints and glitter glue to represent a stylised Christmas tree. The star on top is an embroidery patch from my stash, and the Prima birdy sits on a bit of driftwood I found on the beach. I've coated the inside of a tiny glass jar in glitter glue and attached it so that it is 'sprinkling magic' on the tree. :)


There's even some tiny tiny bells where the banner ties on to the driftwood. I've used some flyscreen in the background and some star brads and Dimensional Magic to add even more texture.

Ok, next! This is a simple, modern advent calendar which uses shipping tags as its starting point, and on most of them is a little sewn pocket just the right size for a chocolate coin.


I've used a range of papers and tags from the Mint Twist collection as well as a few die cuts, rub-ons and the numbered stickers. Then I've added a bit of bling here and there and sewn the lot together on some candy striped bias tape. This will hopefully solve the arguments between Miss 2 and Mr 4 who fightt about who gets to take the chocolate out of the pocket... they have an advent calendar each now! I made this one a few years back which I love, but it is really big and hangs a little too low so it can be raided too easily!


Anyway, back to the layouts... next I have used a scallop-edged 12x12 paper for a non-Christmas layout (told you it was a versatile collection!). I've actually used the plain white reverse of this paper to make a baby themed layout, fixing it to the blue background and adding some pink paper and book paper pieces to the underside of a couple of the ornament cut-outs. As this was the reverse of the paper, the Kaisercraft branding and barcode information was printed on the bottom so that's where I had to put my photo - one of Holly when she was a few hours old. I've added some Kaisercraft flowers and vintage lace for extra girliness, and softened the white background with some silver and blue Glimmermists.


Another layout using some of the die-cut shapes and sweet Rudolf tag with some glittery green ribbon for a bit of sparkle!


This next one is a clean modern layout, using the Christmas tree and wreath die cuts and a Kaisercraft wood flourish which I've misted in red. I've stitched a few flags down the page and added a bit of bling to make it sparkle.


And for my final project I've put together a mini album using this sweet linen covered album my sister in law gave me recently. It details the '12 essentials of Christmas' according to our family, and I've used a wide range of the Mint Twist papers and die cut shapes throughout the album, including this sweet string of stockings across the front cover.


You can click on the images below to get a better view of the inner pages. I found the Mint Twist collection great for this kind of album, there's lots of little fun bits and pieces perfect for conveying the hustle and bustle of Christmas with children!


Whew! That's it. I hope you are inspired by these projects and you pop in to Pages 2 Scrap soon to get a start on your Christmas layouts and gifts; the silly season will be here before we know it!


Stay crafty,
Leonie :)