Friday, August 31, 2012

Page 2 Girls DT Projects - August - Sam

Hi Everyone and Happy August !!!

Winter will soon be behind us and Fathers Day just around the corner.

This month Features the Beautiful " Weekend Market " range from Bo Bunny. this range is fantastic for Fathers Day cards, layouts and "Off The Page" projects.

This month i have created a mixed media canvas to showcase this stunning range.


Here's how it was created.....

I started with a plain deep edge canvas, Tore up sheets of the range as well as book paper and atlas pages. Next i used STUDIO Multi Medium ( matte ) to adhere the torn pieces to create a collage background effect. Allow to dry .


Next I took an acyclic paint Dabber in Denim and "distressed" the edges of the canvas. I love using these dabbers as there is no mess and no bush required. After the paint had dried , I used Darkroom Door stamps to stamp randomly around the canvas ( I used cobalt, black and sepia stamp pads ).
To add texture to the canvas , I have added micro beads in chocolate and attached then with Glossy Accents.Sweeping some Inka Gold over the micro bead enhances the texture and a little around the edge gives the canvas a rich boarder.


Next I pulled out my metal stash of charms and bits and pieces and added them to one corner. I used a globe that had been cut in half to add interest. Tim Holtz metal embellishments are featured in my canvas as well as Bo Bunny and Vintaj Charms . There are no rules when creating a canvas and I defiantly love to embellish them to my hearts content :)


I used old wooden Scrabble tiles to add the title but chipboard works a treat to . Remember you can order custom made chipboard titles and embellishments from Pages 2 Scrap to add that personal touch to your canvas.


Finally using brown card stock I matted my photo and used Foam Tape to pop it off the canvas.

I hope I have inspired you to create your own canvas to showcase your Family Memories.

Thank you for stopping by :)


Tuesday, August 28, 2012

Page 2 Girls DT Projects - August - Karyn


I think I am suffering celebration withdrawls! July in our house is bedlam with a number of family and friends celebrating birthdays - me included! My middle son Tom turned 16 and got his L's and an apprenticeship!! Look out world!

Our August kit was simply stunning and I might add that it suited me to a T!! I began with a layout of my Mum & Dad on their wedding day in 1965. They were so young! I tried to keep the page very simple as the paper was the star. The fabulous chipboard in our kit was my inspiration for this page. I painted the chipboard with texture paint and left it quite rough to add depth to the chipboard. I inked over the top of the paint and voila!


My second layout was my attempt at sticking with a male theme.....sort of! Our brief was to have a masculine theme if possible and these photos immediately sprang to mind. As the background paper had a Fleur De Lis on it, I used the chipboard shape to tie it all together. The chipboard shape was sprayed with mustard glimmer mist to give it a pretty sparkle. To give a bit of interest to the bottom of the layout, I added some tiny flowers entwined in the string .


Finally, I was inspired by the sticker in my kit that says "a father is someone you look up to, no matter how tall you are". I found an old Kaisercraft mini album kit in my stash and decided to take just one part of it to turn it into a mini wall hanging. I used the measuring tape element from the kit along with more chipboard. This chipboard I stained with the Tim Holtz distress inks and edged with a brown ink. The doily was sprayed with glimmer mist to make it sparkle ever so subtly and then I scrunched it up to give it character. Being that I am so finicky with my work, I painstakingly covered the back of the wallhanging as well as the front and then inked the edges to complete the look.


Almost forgot about the cute little tag and card I made with the paper that was left over....the tag is just a standard shipping tag that I attempted to decorate with the concertina style paper folding.


The card was made using some leftover papers from our kit along with some items from my stash.


Thanks for the wonderful inspiration again this month Tracey.....it makes me look good!


Thursday, August 23, 2012

Upcoming Class 25 August


Kim Wyatt
Saturday – 3:00pm – 5:00pm.
$30.00 (includes kit).


A beautiful page to display a wedding photo or the one you love. Embossing, Layering, bling and inking. A perfect balance for a page with a photo that you “Adore”.

Wednesday, August 22, 2012

Upcoming Class 25 August

 Tracey Shenton

Saturday –12:30pm – 2:30pm
$30 (includes kit)


If you ever wanted to know what Art Journaling is all about then this class is for you.  In this class you will learn lots of delicious techniques to help you along your Art Journal journey.  You will experience the magic of Dylusions Inks, Stamps and Stencils.

Tuesday, August 21, 2012

Upcoming class 25 August

25th Aug - Copic for Beginners – Part 3 -
Dawn Lewis

Saturday– 10am – 12pm.

$30. (Includes 2 markers of your choice).


Following on from Part 2, in this class you will learn more about how to use your Copics. You will learn 2 Colourless Blender techniques, as well as how to customise your own embellishments. There will be plenty of time to play and perfect your techniques with a Copic certified designer on hand to guide and assist where needed.


Monday, August 20, 2012

Upcoming Class 23 August

23rd Aug - “My Man” - Scrapbook Page -
 Tracey Henly

Thursday– 10am – 12pm

$30.00 (includes kit).


Using the wonderful Masculine paper Range by Graphic 45 Communique and the heritage Twiddleybitz chipboard , You will create a timeless layout to feature the man in your life. Tracey will teach you how to give your layouts dimension by creating a 3d chipboard frame.


Sunday, August 19, 2012

25th Aug - Scrap and Pizza Night

Saturday – 6pm – Midnight
$20.00


Come and get creative with us at our monthly Open Scrap Night, held on the last Saturday night of every month.
Bring your friends and enjoy a fun night of creativity whether you are a scrapbooker, card maker, off the page creator or like to dabble in mixed media.
 There will be pizza & soft drink for dinner included in the entry price, plus a great opportunity to see what’s new, and ask staff about all the latest products in person!
We welcome all of you who have been before and would love to see some new faces and don’t forget that the store is open for your convenience during the night

Thursday, August 16, 2012

Page 2 Girls DT projects - August - Leonie


Hello all, Leonie here, I just wanted to share the DT projects I have completed for Pages 2 Scrap with my August kit. This kit featured the versatile Bo Bunny Vintage Market collection papers and some other awesome goodies!

The first thing I made was this little box - I'm planning to use this little box to store all the silly notes my husband and I leave each other on an antique tin receipt hook we have in our bedroom. I have kept it quite simple so the lovely paper can take pride of place and not be overwhelmed by too much embellishment. The 7Gypsies brass handle has been on my list to use for a while and I figured it would match really well with the 'Dot' paper and dark blue Bazzil from my DT kit. 


I used the 7Gypsies chipboard tag elements from my kit around the base of the box - I really like the scalloped edging and the fleur de lys motifs, so I inked them with Versacolour ink in Lagoon Blue and used a bit of Vintage Photo Tim Holtz distress stain, and a bit more Neptune Versacolour ink on the edges. I was going for a bit of a verdigris metal effect.


For the inside of the box, I've just painted it in a dark blue Kaisercolour paint, and under the lid is a little quote about love letters which I've written on a Bo Bunny Noteworthy die cut.

The beaded trim around the edge of the box was something I found in my sewing stash left over from making Christmas ornaments a while back. You could use any pretty ribbon or trim to finish off the edge; Pages 2 Scrap have a fantastic selection. 


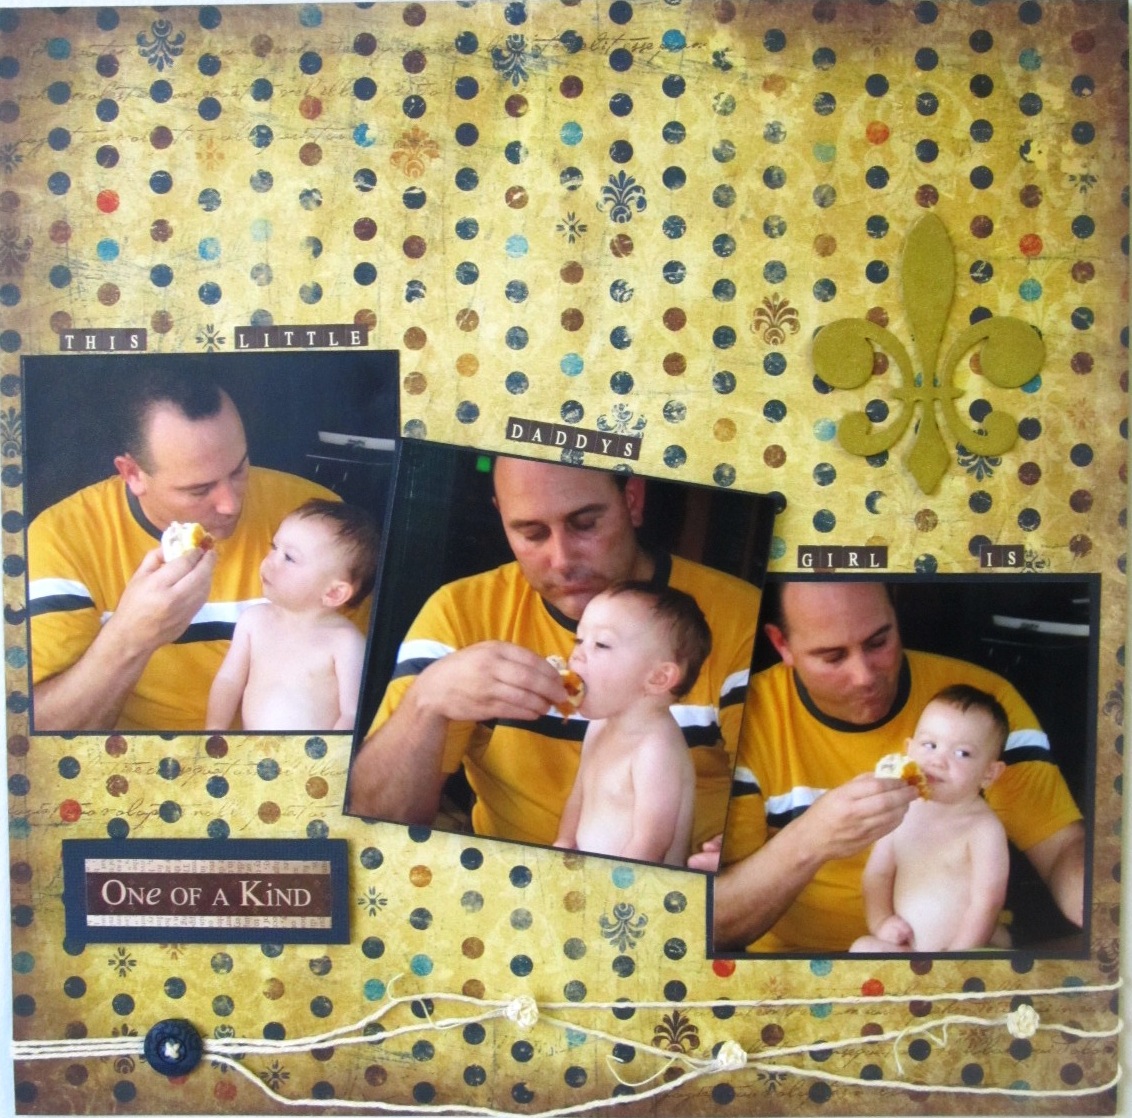
I put together three layouts with the remaining bits of my kit: the first uses the Bo Bunny Tapestry paper as a base with a co-ordinating Vintage Market Collection cardstock sticker as the title.


The sticker - My Dad, My Hero - was the starting point for this layout, and when I found this old shot of my dad taking me fishing when I was 18 months old, I had found my theme. The 7Gypsies chipboard vine was perfect as 'seaweed' - I've just covered it in Tattered Angels Glam in 'Dirty Martini' - and I used a bit of black sinnamay mesh I found in my kids craft box to add some texture.


The gold card behind the photo was cut from the envelope my kit arrived in(!), and I used the dark blue Bazzill to cut out some fishy shapes.


I've used more of the 7Gypsies chipboard elements as 'waves' - this time a long wavy shape which I've coloured with Tim Holtz distress stain in Wild Honey. I loved using these chipboard elements; they are really nice quality and thick enough not to warp and bubble when you stain or paint them.


Next, I tried something a bit different to give the background of this layout a tattered, aged feel - I used an old dress pattern and some PVA glue to create an textured base, and mounted my photo on a vintage book page and little kraft envelope. I cut out a few of the labels from the Vintage Labels paper, and wrapped some rough gardening twine around the page a few times. The beautiful Vandoros organza ribbon from my kit added a little bit of sparkle to the page - I fixed it with some Tim Holtz trinket pins and added a little bit of vintage lace.


The key is another of the 7Gypsies chipboard elements - this time I covered it in washi tape for a pop of teal colour. The little 'family' word in the bottom corner was part of the edge strip saved from a sheet of Kaisercraft Tasty Treats paper, and the sweet little camera charm is also from the Bo Bunny Vintage Market collection.


Ok - last one! I love how my Pages 2 Scrap kits challenge me to get lots of different layouts out of a small selection of papers. For this layout I've gone with a completely different style to the ones above and was inspired by the crowns and wings in the 7Gypsies chipboard elements pack - they made me think of graffiti and skater style patterns, and also when I printed my photos and realised my black ink had nearly run out, I kind of liked the bluish x-ray effect!


I splattered the Bazzill with some silver paint, but smeared a bit of it by accident so turned it into a moon - then I punched some circles from the reverse of the Vintage Labels paper to make twinkly planets and painted the crown and wings in more silver paint. The blue star is one of the chipboard elements covered in washi tape, but paint or ink would work just as well.


I also included the leftover scalloped edging which I'd already inked for my love letter box - I think they kind of look like clouds. 


I used a little more of the sparkly Vandoros organza ribbon to add a bit of warmth, and some other blue satin ribbons. The title is made up of a long straight piece from the 7Gypsies cardstock elements, covered in blue washi tape, plus some American Crafts thickers and a blue diecut Noteworthy shape from Bo Bunny.

I really enjoyed putting these projects together and hope they inspire you to create something lovely with the Bo Bunny Vintage Market collection and other goodies available from Pages 2 Scrap!

Leonie
xo

Monday, August 13, 2012

Upcoming Class 18 August

18th Aug - Copic Beginners Marathon -
Dawn Lewis

Saturday 10:30am –3pm
$60.00 (includes 6 Ciao Markers of your choice).


In this class you will learn the basics about Copic Markers and how to use them with stunning results.


We will be sharing tips and tricks to give you that polished look to your Copic projects – choosing the right colours, how to fix any mistakes as well as learning how to blend seamlessly.
You will also try Tri-Colour blending and some feather blending. You will learn how to blend two opposite colours for a stunning effect, as well as reinforcing your colour blending techniques.
You will also learn 2 Colourless Blender techniques, as well as how to customise your own embellishments.
There will be plenty of time to play and perfect your techniques with a Copic certified designer on hand to guide and assist where needed.

Thursday, August 9, 2012

Page 2 Girls DT Projects - August - Karen

Hi Everyone it's Karen back to show you a couple of masculine pages I done this month using the Bo Bunny Vintage Market Collection.  I just love everything Bo Bunny put out.  The vintage designs and the beautiful colours in this collection are just amazing.

The first page I made is of my Dad when he was a little younger (40years younger!!!).  I made little pin wheels with the paper and addded a couple of buttons just to give it the 'man effect'.  I also love Words or Whatever little vintage cars which was a must for this page.


The second page I made using the same collection is of my husband and dad mucking about in a vintage shop in the Blue Mountains.  I covered the vine in texture pase and after drying painted with bronze paint.


I hope you like what I have done and feel inspired to have a go at using some of this lovely collection.

Supplies used:

7 Gypsies Chipboard Tag Elements
Bo Bunny patterned paper - Vintage Market Collection - 'Vintage Labels"
Bo Bunny patterned paper - Vintage Market Collection - "Dot"
Bo Bunny patterend paper - Vintage Market Collection - "Rulers"
Bo Bunny patterned paper - Vintage Market Collection - "Tapestry"
Bo Bunny -Vintage Market Collection - "Noteworthy" die cut elements
Bo Bunny - Vintage Market Collection - Buttons & metal trinkets
Bo Bunny - Vintage Market Collection - Cardstock Stickers
Vandoros Organza ribbon - Mocha

Thanks for stopping by
Karen

Wednesday, August 8, 2012

Upcoming Class 10 August

10th Aug - “Adore” - Scrapbook Page - Kim Wyatt

Friday– 10am –12pm.

$30 (includes kit).


A beautiful page to display a wedding photo or the one you love. Embossing, Layering, bling and inking. A perfect balance for a page with a photo that you “Adore”.


11th Aug - “Timeless” – Scrapbook Page. - Tracey Henly

Saturday–2pm–4pm.
$30.00 (includes kit).


Come along and create a gorgeous single page layout where you will learn how to add dimension to your pages using chipboard, Glimmer Mist, and flowers.