Wednesday, March 28, 2012

Saturday Scrap & Pizza Night - This weekend!


Do you want to catch up on all your scrapbooking??  Come and join us for our monthly 6pm - midnight scrapbook & pizza night!

For just $20 you will get a great night to scrap and chat with friends as well as pizza and a softdrink!

This Weekend!

Saturday 31st March - 6.00 pm - Midnight.

Call the store to make your booking  1300 664 228 or you can book online here.

We look forward to seeing you there!

~The Team at Pages 2 Scrap~


PS: If you want to extend your scrapping time and make a whole day of it, why not book into one of the classes we have beforehand? 

There's No Place Like Home - Layout (10:30am - 12:30pm) with Sam Killoran.

Scrapbook Layout Marathon (1pm - 5pm) with Lisa Sturmann.


EASTER TRADING HOURS:

Friday 6th April (Good Friday) = CLOSED.

Saturday 7th April (Easter Saturday) = 10am - 5pm.

Sunday 8th April (Easter Day) = CLOSED.

Monday 9th April (Easter Monday) = CLOSED.

Tuesday 10th April = Normal trading hours (9am - 5pm).

Tuesday, March 27, 2012

Special Deal on Cutting Dies for Members Only!


4 DAYS ONLY! 30% OFF ALL CUTTING DIES!


From 9am Tuesday 27th March until 5pm Friday 30th March we are offering our members only a massive 30% OFF ALL CUTTING DIES!*


Spellbinders Dies - 30% OFF!

Tim Holtz Sizzix Alterations Dies - 30% OFF!

Cuttlebug Dies - 30% OFF!

All other cutting dies in store - 30% OFF!

Hurry in to grab a bargain!

~The Team at Pages 2 Scrap~

*This promotion is for MEMBERS only. Only available from 9am Tuesday 27th March until 5pm Friday 30th March or while stocks last. Does not appply to special orders. No further discounts apply.

Monday, March 26, 2012

Page 2 Girls - DT Project - March - Libby


Hello again! Here are my March DT work. Firstly the layouts. For this first one I used the Crafters Workshop template and cut sections from the background kraft paper. The frame is surprise, surprise a Slice frame from the Grandma's Attic card. The banner is from the Bellissimo card. The heart... ah the heart is made from my new favourite product... Inky Antics honeycomb paper. So easy to use and fills the kitschy hole inside me lol


this 'BUN' page uses a lot of the DT paper pack from the We R Memory Keepers Cotton Tails range. I embossed some tags to go with the range and cut out some of the easter themed sentiments to go with these photos of Charlotte and her 'Bun' Some days I get the camera out and snap away even when the lawn is long and the kids are wearing holey trackies and no shoes.


Wouldn't you like to fly in my beautiful, my beautiful balloon?

ok I'll stop now.... the buppa balloon! 

By now, you will be used to me being quite unoriginal and stealing sourcing ideas from all sorts of places. Do you like PINTEREST? Oh my goodness PINTEREST is a place to save pictures of stuff you are inspired by or want to make, ideas for the home, clothes, crafts. You name it PINTEREST has it! It can make you late for work, just warning ya!

Anyway back to the balloon. I might have taken the inspiration from Martha Stewart! Click on the link to go directly to the how to page for paper mache balloons.

Frustrating little sucker this was! Only because the first one I made with a much smaller balloon. I hung it in a tree at the front of my house to dry (my neighbours are used to my lawn being used as a spray booth - covered in paint... strange things hanging in trees etc) I went back inside the house and began the ironing with a smug, self satisfied look on my face to be brought straight off my self imposed high horse with a very loud bang! The paper mache bit does take quite a long time to make and so imagine my disappointment when I opened the front door to find a wet soggy mess of mache on my lawn in a nondescript scrumpled mess. Boo hoo my balloon had burst, fallen off it's peg and out of the tree, simultaneously blowing an unrecoverable hole in the side of my beautiful, my beautiful balloon! (I dare you to get that song out of your head now lol)

So balloon Version II was much better. A bigger base balloon and more glue and more paper! 


So once made and dry I divided the balloon into sections with kraft strips. I found my local newsagent sells cheap packets of A4 paper in all sorts of colours and even kraft. I love using this paper for my Slice too. It's a bit easier to cut because of the much lower GSM (weight) and just one of those things I've worked out along the way. I've used Kaiser pearls and pearls from the 'by the metre' section at the shop. I used paper from the Dt pack range on the rosettes around the balloon and the Pink Paislee tissue paper in the basket. Speaking of the basket I think I got it as packaging a while ago. When I picked up my DT pack I did what I usually do and added Kaiser paint in the same colours to my shopping basket. Can never have enough paint! I used that to paint the balloon sections and basket and added ruffle puffly trim and tissue paper to the bottom of the balloon (to hide the dodgy hole I made at the bottom of the balloon) Little chicks (with bizarre straw hats mind you) popped in the basket as test pilots make up the passengers in my whimsical creation.


Nutty hey?


Tim Holz rosettes! I can't get enough just in case you hadn't noticed.


Thank you so much for the kind feedback on my DT work. Sometimes you step back from something you have spent hours on and realise you LOVE IT! It's so nice when even just one other person says they like it too.

I have to say wondering around the shop I do get all tingly and inspired by the fabulous new stuff, the DT work on display and the gorgeous classes. I hope to see you at one of the creative girls classes soon! I don't know about you but I can't wait for Donna Downey's classes. She is a true life artist and I have loved her work for so long. Tracey bringing her to Pages 2 Scrap is so exciting and I for one an truly greatful. See you there!

OK that's quite enough from me, thanks for looking, Lib x.


Friday, March 23, 2012

Classes with Sarah Schwerin - Saturday 24th March!

Hi everyone!

Sarah here poppin in to tell you about a couple of classes that I am teaching this Saturday 24th March.


Oh-Sew Inky Cards

Saturday – 10:30am – 12:30pm.

$30.00 (includes kit).

In this class we will create 4 eye catching collage style cards using the new Sew Stamper tool from We R Memory Keepers.

You will also learn how to create gorgeous backgrounds using Distress inks and stamps.


Saturday – 1pm – 3pm.

$30.00 (includes kit).

Come along to this class and let Sarah show you how to make the most of your stamp stash to create a gorgeous scrapbook page.


To book please call us on 1300 664 228 or book online by following the links above.

I hope to see you there!

~Sarah~

Monday, March 19, 2012

Page 2 Girls DT Project - March - Jane

Hi everyone, Jane here! Well this time I got to play with some yummy Easter products that are just the cutest!! I love the sentiments on the We R Memory Keepers Cotton Tales glitter paper, I think they could be used for other occasions and not just forEaster! I also found the Glitzin Glamour purple glitter glue to be fantastic!! I love that it had so much glitter in it, you don't get a patchy look at all!!

First card up - 'There's nobunny like you'. I just had to use this sentiment, just look at that adorable bunny!! I used the EK Success large, medium and small retro flower punches to create the flowers, they were held together with Cotton Tail glitter brads and Glitzin Glamour glue was applied around the brad, look how it sparkles!!  A Martha Stewart fond punch and green card was used for the leaves.


Card two - 'New Beginnings'. This card could be used for a new born or a Christening? The Cotton Tail paper already had that lovely scalloped edge and because the stickers are embossed there isn't much else you need to do~ In my DT kit came this fancy tissue paper (yellow) it's firm enough that you can tie a bow in it, love, love, love!


Card 3 - 'You Crack me Up! Another card that's just not for Easter! I have quite a few friends that crack me up! The chick and the three Easter eggs are all from the Cotton Tail embossed sticker sheet.

Card 4 - 'Cute as a Bunny'. This would make a lovely little baby girl card. The crocheted flower is adorable (mental note to myself - must get more). I cut the little bunny out of one of the papers and pleated that fabulous tissue paper down one side, this added colour and texture! A paper doily was used in the background.


I had so much fun creating with this months DT kit, I hope I have given you some inspiration not only for Easter!
Cheers and Thanks for looking, Jane

Thursday, March 15, 2012

Pages 2 Scrap Spring Retreat at Kooindah Waters Resort.


 Once again we are holding our Spring Retreat at Kooindah Waters Golf and Spa Resort! Join us from 12pm Friday 19th - 3pm Sunday 21st of October to indulge in a weekend of scrapping, chatting, and fun with like minded friends at a luxury venue!

We will scrap in the gorgeous Pool View Room, indulge in beautiful meals and comfortable accomodation, and you will have access to fantastic scrapping and papercraft supplies while you work.


You will also have the opportunity to participate in make-n-takes, prizes, and giveaways. You won't want to miss it!

Retreat Options:

Option 1 - Full Package = $489.00.

Arrival after 12pm Friday 19 October.

Meals: 
  • Friday Dinner
  • Saturday Breakfast, Lunch and Dinner.
  • Sunday Breakfast & Lunch.
Accommodation:

Friday & Saturday Night

Departure by 3pm Sunday


Option 2 - Sat/Sun Only = $379.00.

Arrival after 9am Saturday 20 October.

Meals:
  • Saturday Lunch & Dinner.
  • Sunday Breakfast & Lunch.
Accommodation:

Saturday Night.

Departure by 3pm Sunday.


Arrival after 9am Saturday 20 October & Sunday 21st October.

Meals:
  • Saturday Lunch & Dinner.
  • Sunday Lunch.
Accommodation:      

N/A

Departure by 3pm Sunday


Accommodation:

Acccomodation is based on Twin Share Studio Room. To be guaranteed accomodation bookings are requested by 30th July 2012. All rooms include full bathroom, some with kitchenette (some bar fridge only). Maximum occupancy is 2 people.


You can pay in full, or choose a monthly payment option. To book, please call us on 1300 664 228 or you can book online here.

We hope you'll join us!

~The Team at Pages 2 Scrap~

Wednesday, March 14, 2012

An Amazing Deal on La-La Land Craft Stamps!


FROM NOW UNTIL 5PM 31ST MARCH 2012, 

BUY TWO OR MORE LA-LA LAND CRAFTS STAMPS

AND GET THEM FOR 40% OFF*!


That's right - buy 2 or more in one transaction and get them for 40% off! What a great deal!!

We have a HUGE range of La-La Land Crafts stamps in store, so there is something to suit everyone! They are perfect for colouring with Copic Markers, pencils, or water colours and are great on both cards and scrapbook pages.

So what are you waiting for? Come in to Pages 2 Scrap and grab yourself a bargain today!

See you soon!

~The Team at Pages 2 Scrap~

* This offer is available from now until 5pm Saturday 31st March 2012, on La-La Land Craft stamps only. Only while stocks last, on items that are in stock only. Offer does not apply to special orders. No further discounts apply.

Monday, March 12, 2012

Donna Downey is returning to Pages 2 Scrap!

We are so excited that the talented Donna Downey is coming back to Pages 2 Scrap in May 2012!

Donna will be teaching 5 amazing classes Friday 4th May to Sunday 6th May.

All the details for the classes are below.  You can book by calling the store on 1300 664 228 or online here.


Friday 4th May - 6pm to 9pm - $110.00

Vintage Chic

6 x 9 Cardboard Mini Album

3 Hour Class

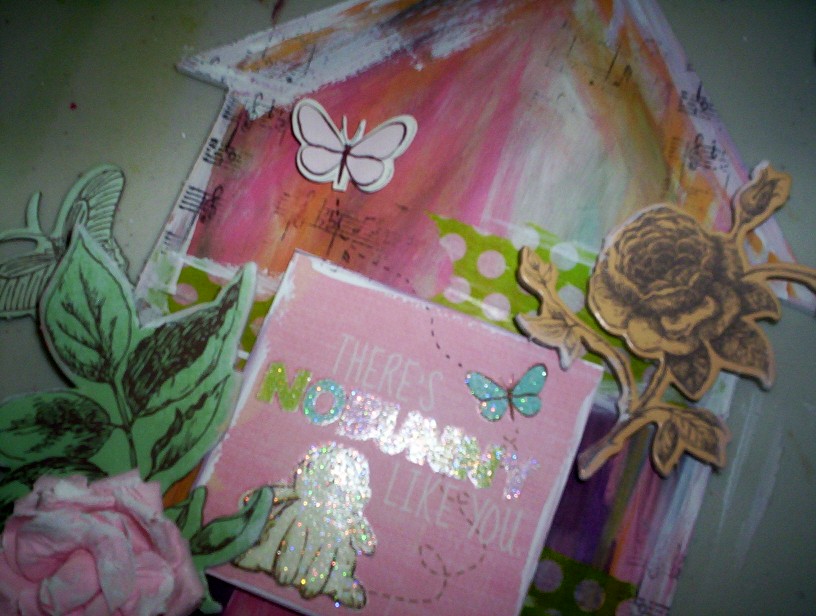
This album is the perfect blend of shabby & chic.  Each cardboard page has been delicately edged in distressed inka-inka gold and dressed in a frayed swatch of soft muslin.  The album is layered in burlaps, canvas, silk flowers, frames, a time piece and my favourite part... a pair of soft feathery angel's wings.  The soft tone on tone colour palette gives this book a truly romantic feel. 


Saturday 5th May - 10am to 12.30pm - $100
Pan Pastels

From the Heart


2.5 Hour Class

Art is a measure of passions and creativity.  Expressing yourself through colour and design comes from the heart.  Opening yourself up to the creative process can be a bit intimidating, but could very well change your life.  This workshop is designed as an introduction for beginners as well as to challenge the seasoned artist.  As students, you will explore and enjoy creating visual depth; adding bold colour and texture to your mixed-media art pieces.


Saturday 5th May - 1.30pm to 4.30pm - $100.00

"She is Strength" Poppy Collage

6 x 18 Mixed Media Canvas


3 Hour Class

This workshop is designed to guide you through  the multi-layers building of creating and original mixed-media canvas 6"x18".  By using mixed media tags, modelling paste, gesso, tapes, fabric and paper elements each layer will lead you close to creating a textural and beautiful piece of artwork celebrating strength and beauty.  By keeping our colour palette simple, using lots of dimensional elements and several simple techniques for applying texture you will tap into that inner artist and watch your blank canvas transform into an amazing collage.


Saturday 5th May - 6pm to 9pm - $100.00
The Big 40!

Building Mixed-Media Backgrounds - Over 40 tips, tricks and techniques.


WARNING: THIS WORKSHOP MAY LEAD TO INSOMNIA CAUSED BY IDEA OVERLOAD
3 HOUR CLASS
Since I am now 40, I thought what better way to celebrate this new decade than by sharing my favourite top 40 tips, ticks and techniques for building better art journals and mixed-media backgrounds.  Like all great thinks building a strong foundation or base for your ideas is important, mixed-media and art journaling are no different.  This workshop is going to put all these ideas at your fingertips as you create your own personal reference book for mixed media backgrounds and techniques as we create and fill the pages of your NEW art journal.  Each student will receive and work in one of my newly released art journals, the journals heavy weight pages are perfect for layering, paints, inks, collages, PanPastels, paper, etc and I plan to do all that and more in this workshop!  We will build over 40 techniques and pages worth of ideas using several different wet and dry mediums filling one incredible idea book that will surely get your mind spinning with idea!

Sunday 6th May - 10am to 3pm - $150
Inspirational Journal: "Layered Composition"

Mixed media/art journaling
5-hour workshop


If you have taken your first steps into art journaling (inspiration journal: Creating a visual diary) and/or are looking to take your pages to the next level, this is the workshop for you. learn more about building layers using mediums, stencils, india inks, acrylic paints, watercolours, papers, tapes and more...
Art is about pushing the boundaries and making a statement this workshop is designed to empower you to listen to your creative instincts and teach you how to layer colour, texture and your artistic personality into your journal pages.
you will also learn a tips and techniques about freehand drawing, adding details as well as composition and balance.


*****
We look forward to seeing you there!

~The Team at Pages 2 Scrap~

Page 2 Girls DT Project- March- Kate


Hoppy March!

And because it is a month before Easter it is the perfect opportunity to grab this lovely collection from We R Memory Keepers- Cotton Tail and team it up with some pretty coordinating embellishments to create some lovely Easter Off (Beyond) The Page pieces or layouts to compliment the season. 

I loved the soft pastels in this collection, it reminds me of all those pretty dyed eggs you see around this time of year, which is a big tradition for some families. Funnily enough, my projects I am showing you today don't have an Easter theme, so I will demonstrate to you that they can be used for non-Easter crafts. 


There's No Bunny Like You


  • I have had this Kaisercraft Beyond the Page Arrow album for awhile. You could use any shape of MDF type board to make this. Pages 2 Scrap sells a range of Beyond the Page products and even strong chipboard could be used in lieu. I used ONE page from this package.


  • I raided my Kaisercraft paint and found a number of tubes to coordinate with the colours in the WRMK collection- Cotton Tail which I was using. I used my finger to spread different layers of paint over my board.


  • Using the Pink Paislee Daily Junque Printed sheets, I tore bits off it and glued them at various positions on the board.

  • I cut a sentiment from the Glitter Paper WRMK- Cotton Tail Sentiments sheet, I traced around the edge with white paint using my finger and then foam taped it for dimension to the centre of my board. At this stage, I used the rest of the white paint and my finger, once again to trace around the edges of the MDF.


  • When I was in Pages 2 Scrap for a shop, I browsed through the clearance baskets and came across a bargain with the Kaiser Secret Bird Society Chipboard. I knew it would match perfectly with these WRMK colours! So I also painted around the edges of each piece with white paint and my trusty finger again!! And adhered using foam tape to either side of the sentiment.

  • A perfect time to add in a WRMK Cotton Tail Embossed Sticker- Butterfly. I also used some Glitzin Glamour (Purple) on my finger and added some sparkle to my board. Optional: you could also do some stamping on your board like I did with my Kaiser Background Stamps.

  • And there you have it! Add some little extras like more WRMK Cotton Tail Embossed Stickers, Kaiser Paper Blooms, and some green Bloomers trim! All available at Pages 2 Scrap! Easy!

Materials

Kaiser Beyond the Page Arrow Album (1 piece from pack)
WRMK Cotton Tail Sentiments
WRMK Cotton Tail Embossed Stickers
Kaiser Paint
Kaiser paper blooms
Pink Paislee Daily Junque Printed Sheets
Glitzin Glamour Purple
Bloomers Trim
Kaiser Background Stamps

Layouts

I took the opportunity to do two layouts using the WRMK Cotton Tail range as well. 

Cute as a Bunny
- Use sentiments off the papers as titles on your layouts instead of alphas.
- Cut your own leaves from green papers.
- The WRMK embossed stickers leave a lovely embossed image on the backing paper of the sticker, use this as a flower as well!!

Materials

WRMK Die Cut Cotton Tail- Sweet Spot Patterned paper
paper doilys
Pink Paislee Daily Junque Printed Sheets
WRMK Cotton Tail Patterned Papers
WRMK Cotton Tail Embossed Stickers
Kaiser Secret Bird Society Chipboard
Kaiser Paper Blooms
Glitzin Glamour Purple
WRMK Cotton Tail- Glitter Brads
Kaiser Paint
WRMK Cotton Tail- Sentiments


Explore Bunnings

- Trace around flowers in your own stash, onto patterned paper and cut them out to make coordinating flowers for your projects. 
- Make masks by using paper doilys.
- Doodle little flowers on your page and put a brad through the centre. 

Materials

Bazzil Walnut Cardstock
Kaiser paint
Glimmer mist
Kaiser Secret Bird Society Chipboard
Bloomers Trim
Button
Staples
May Arts Burlap String Natural
WRMK Cotton Tail Embossed Stickers
AC Thicker Letter Stickers
WRMK Cotton Tail Glitter Brads
Pink Paislee Daily Junque Printed Sheets
WRMK Cotton Tail Patterned Papers


Thanks for stopping by! If you like anything I have used on my projects, pop into Pages 2 Scrap, the girls will point you in the direction of everything you need to create your own gorgeous pastel inspired projects.

Love Kate xo


Wednesday, March 7, 2012

Special Announcement!

We are pleased to announce that Pages 2 Scrap will now be stocking the popular "Scrap 365" and "Craft Stamper" magazines!


Craft Stamper:

The UK's number 1 magazine for stamping enthusiasts! Each issue comes with a free acrylic stamp on the cover.

The aim is to reach as many stampers as possible and to guide them through from those just starting to stamp to those who have been stamping for many years. The step by step instructions are clear and easy to understand, with photographs to help the stamper along the way.


Scrap 365:

For scrappers who do it every day!

Scrapbookers are amongst the most creative and eager to learn types of crafter, and the content of Scrap365 magazine reflects this, by providing inspirational tutorials and clever, original ideas to make their scrap projects sing! It covers a wide range of articles reaching beyond the traditional 12x12 layout; mini albums, digi scrapping, art journaling and off the page creations all feature prominently. Traditional layouts are a big part of the magazine, but with a focus on adding creativity and techniques.

Detailed step-by-step tutorials sit alongside pages of truly inspirational scrapbooking projects from an international team of talented designers. It covers the whole range of styles from clean and simple, to shabby chic, to grungy – with something to appeal to every type of scrapper.

The fresh and modern design of this magazine lets the artwork really shine.


Each magazine will be $10.99 - however members and subscribers will be able to buy the magazines at the special price of $9.99 each!*

Yep that's right - you will be able to subscribe to these monthly magazines! If you are interested in subscribing, please email us on store@pages2scrap.com.au to regiuster your interest.

The March issues of both magazines are in store now, as well as a few back issues!

We look forward to seeing you in store soon!

~The Team at Pages 2 Scrap~

*No further discounts apply.

Page 2 Girls DT Project - March - Fiona


This month the Page 2 Girls are creating with WRMK Cotton Tail products.  Although this set is all about Easter and Spring, I knew I had to squeeze a baby welcome card out of that beautiful chequer paper!  Here are my projects for this month:

Card #1 - Welcome Baby

Cut Kraft cardstock 8” x 6”, score and fold.  Hand stitch a frame on your Kraft with white embroidery thread.   


Cut WRMK Cotton Tail Colour Me Plaid (pink side) to 5 ½” x 3 ½”.  Cut WRMK Cotton Tail Colour Me Plaid (chequer side) to 5 ½” x 2 ½”.  Cut WRMK Cotton Tail Sweet Spot to 5 ½” x approx ¾” (just enough to get the pink scallop).  Ink all three pieces with Victorian Velvet Distress Ink.  Attach all three pieces together, then attach this to Kraft base inside the embroidered frame.  Attach WRMK Cotton Tail Embossed Sticker – chick hatching.  Stamp ‘welcome baby’ from Darkroom Door All Occasions Set in Victorian Velvet Distress Ink.

Card #2 – Spring has Sprung

Cut Bazzill Walnut 8” x 6”, score, fold, ink edges in Gathered Twigs Distress Ink and set aside.  


Cut WRMK Cotton Tail In the Meadow (pattern side) 5 ¾” x 3 ¾” and ink edges with Shabby Shutters Distress Ink.  Cut WRMK Cotton Tail In the Meadow (blue side) 5 ¾” x 1 ½” and ink edges with Tumbled Glass Distress Ink.  Attach the blue piece to the patterned piece and machine stitch the edges and join.  Die cut a small dragonfly using Tim Holtz Fanciful Flight die & ink up the wings and body using Tumbled Glass, Broken China, Chipped Sapphire and Shabby Shutters Distress Inks and assemble.  Cut out ‘spring has sprung’ tag from WRMK Cotton Tail Sentiments and edge with Tumbled Glass Distress Ink.   


Attach some seam binding around blue section.  Tie a bow in some May Arts Burlap String.  Fold a piece of seam binding to make tails.  Attach pattern/blue panel to Walnut card base, attach seam binding tails & tag, attach WRMK Cotton Tail Crochet flower and string bow, and finally the butterfly.

Card #3 – Happy Easter

Cut WRMK Cotton Tail Color Me Plaid 2 ¾” x 10” and score at 5” on the wrong side & ½” away from this score line on the right side, and ink edges in Victorian Velvet Distress Ink.  


Cut WRMK Cotton Tail Sweet Spot (blue side) to 5 ¼” x 2 ¾” and ink edges in Tumbled Glass Distress Ink and attach to inside of card so the scallops are visible on the open side.  Punch or cut a circle in the front of the card.  Attach WRMK Cotton Tail Embossed Sticker ‘happy easter circle’ to inside so that it is visible through the circle hole.   


Attach the ½” section (between the two score lines) to the inner card (so it looks like a bound book).  Finally, attach some May Arts Burlap String around the fold.

Post-it Note Folder

Cut WRMK Cotton Tail Sweet Spot to 3 1/8” x 9” (measuring from the scallop edge).  From the short straight edge score at 3 3/8”, 3 ¾” and 7 ¾” and ink edges and folds with Victorian Velvet Distress Ink.   


Trim the tulip square image from WRMK Cotton Tail Sentiments (ink edges in Victorian Velvet Distress Ink) and mount on a piece of blue WRMK Cotton Tail In the Meadow (ink edges in Tumbled Glass Distress Ink) and attach to folder front.   


Attach the scallop flap to the base just at the fold and add some brads.  Attach the post-it note pad to inside. 

Thanks for popping in for a visit!
Fiona

Sunday, March 4, 2012

Page 2 Girls DT Project - February - Libby Morris


Wheeee it's February already! I hope you have been inspired to scrap some cards or try a mini album this year. Here are my samples for this month. I made two layouts, quite simple ones really. I much prefer 8.5 x 11 inch pages. I find that when I scrap 12 x 12 pages I just don't know where to stop. I love love love my Making Memories Slice and so I cut the little tricycle and the ladybug on the layouts with this fantastic easy to use machine.


The next thing I was inspired to make was this little heart keeper box. That tag says 'be strong'. I have had the box for ages so I covered it in patterned paper and stamped around the edges with embossing ink and sprinkled red powder and heat embossed the stamped hearts. 


This is the box from the front. I used those fantastic Melissa Francis jars of German Glass Glitter around the door frame for a bit of sparkly pop.


When you open the doors they reveal my heart.... ready 1..2..3.. ohhhhh lol
I made the heart from wool felt. I just cut out two heart shapes and hand sewed around the edges. Then I stuffed (I mean really stuffed the heart full off stuffing) the heart and glued it to the back of the shadow box. I do love this little box.

Next I took inspiration from a class I really enjoyed with the very talented mixed media artist,  Linda Baldock. All you need to do is to trot off to Bunnings or Mitre 10 and pick up a $10 roll of annealed wire. It's blackish wire which wont rust and is really quite easy to make into beautiful shapes to make yourself a necklace. It's really forgiving too. It doesn't look too rough like some shiny wire does after you've had a good chop at it. Especially while trying to make a nice round jump ring hee hee. 
If you have the chance my advice is to take as many classes as possible. I love learning new techniques and sometimes branching out into a bit of jewellery making can be very good for the old Mojo. Anyway, here is another dinky little book I made with contact prints and left over patterned paper. I have to say the papers from the My Minds Eye range are gorgeous. I went back and bought up big after I finished my DT projects.


How cute are the Crafty Secrets Vintage valentines?


Graphic 45 metal charm, Tim Holz metal number and Tim's clear crackle.


I hope you all had a fantastic time at the retreat. I missed it this time but I will be at the next one for sure. Thanks for all the support of the Pages 2 Girls... couldn't ask for a nicer bunch of ladies. I hope you get to pop into the shop really soon to see the inspirational wall. It's so full of amazing scrapping.

Lib x