Monday, March 12, 2012

Page 2 Girls DT Project- March- Kate


Hoppy March!

And because it is a month before Easter it is the perfect opportunity to grab this lovely collection from We R Memory Keepers- Cotton Tail and team it up with some pretty coordinating embellishments to create some lovely Easter Off (Beyond) The Page pieces or layouts to compliment the season. 

I loved the soft pastels in this collection, it reminds me of all those pretty dyed eggs you see around this time of year, which is a big tradition for some families. Funnily enough, my projects I am showing you today don't have an Easter theme, so I will demonstrate to you that they can be used for non-Easter crafts. 


There's No Bunny Like You


  • I have had this Kaisercraft Beyond the Page Arrow album for awhile. You could use any shape of MDF type board to make this. Pages 2 Scrap sells a range of Beyond the Page products and even strong chipboard could be used in lieu. I used ONE page from this package.


  • I raided my Kaisercraft paint and found a number of tubes to coordinate with the colours in the WRMK collection- Cotton Tail which I was using. I used my finger to spread different layers of paint over my board.


  • Using the Pink Paislee Daily Junque Printed sheets, I tore bits off it and glued them at various positions on the board.

  • I cut a sentiment from the Glitter Paper WRMK- Cotton Tail Sentiments sheet, I traced around the edge with white paint using my finger and then foam taped it for dimension to the centre of my board. At this stage, I used the rest of the white paint and my finger, once again to trace around the edges of the MDF.


  • When I was in Pages 2 Scrap for a shop, I browsed through the clearance baskets and came across a bargain with the Kaiser Secret Bird Society Chipboard. I knew it would match perfectly with these WRMK colours! So I also painted around the edges of each piece with white paint and my trusty finger again!! And adhered using foam tape to either side of the sentiment.
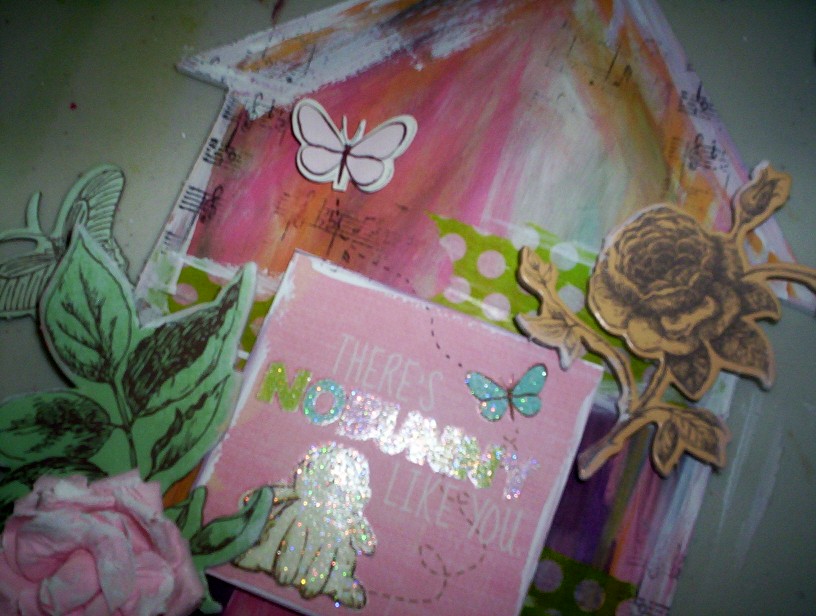
  • A perfect time to add in a WRMK Cotton Tail Embossed Sticker- Butterfly. I also used some Glitzin Glamour (Purple) on my finger and added some sparkle to my board. Optional: you could also do some stamping on your board like I did with my Kaiser Background Stamps.

  • And there you have it! Add some little extras like more WRMK Cotton Tail Embossed Stickers, Kaiser Paper Blooms, and some green Bloomers trim! All available at Pages 2 Scrap! Easy!

Materials

Kaiser Beyond the Page Arrow Album (1 piece from pack)
WRMK Cotton Tail Sentiments
WRMK Cotton Tail Embossed Stickers
Kaiser Paint
Kaiser paper blooms
Pink Paislee Daily Junque Printed Sheets
Glitzin Glamour Purple
Bloomers Trim
Kaiser Background Stamps

Layouts

I took the opportunity to do two layouts using the WRMK Cotton Tail range as well. 

Cute as a Bunny
- Use sentiments off the papers as titles on your layouts instead of alphas.
- Cut your own leaves from green papers.
- The WRMK embossed stickers leave a lovely embossed image on the backing paper of the sticker, use this as a flower as well!!

Materials

WRMK Die Cut Cotton Tail- Sweet Spot Patterned paper
paper doilys
Pink Paislee Daily Junque Printed Sheets
WRMK Cotton Tail Patterned Papers
WRMK Cotton Tail Embossed Stickers
Kaiser Secret Bird Society Chipboard
Kaiser Paper Blooms
Glitzin Glamour Purple
WRMK Cotton Tail- Glitter Brads
Kaiser Paint
WRMK Cotton Tail- Sentiments


Explore Bunnings

- Trace around flowers in your own stash, onto patterned paper and cut them out to make coordinating flowers for your projects. 
- Make masks by using paper doilys.
- Doodle little flowers on your page and put a brad through the centre. 

Materials

Bazzil Walnut Cardstock
Kaiser paint
Glimmer mist
Kaiser Secret Bird Society Chipboard
Bloomers Trim
Button
Staples
May Arts Burlap String Natural
WRMK Cotton Tail Embossed Stickers
AC Thicker Letter Stickers
WRMK Cotton Tail Glitter Brads
Pink Paislee Daily Junque Printed Sheets
WRMK Cotton Tail Patterned Papers


Thanks for stopping by! If you like anything I have used on my projects, pop into Pages 2 Scrap, the girls will point you in the direction of everything you need to create your own gorgeous pastel inspired projects.

Love Kate xo


Wednesday, March 7, 2012

Special Announcement!

We are pleased to announce that Pages 2 Scrap will now be stocking the popular "Scrap 365" and "Craft Stamper" magazines!


Craft Stamper:

The UK's number 1 magazine for stamping enthusiasts! Each issue comes with a free acrylic stamp on the cover.

The aim is to reach as many stampers as possible and to guide them through from those just starting to stamp to those who have been stamping for many years. The step by step instructions are clear and easy to understand, with photographs to help the stamper along the way.


Scrap 365:

For scrappers who do it every day!

Scrapbookers are amongst the most creative and eager to learn types of crafter, and the content of Scrap365 magazine reflects this, by providing inspirational tutorials and clever, original ideas to make their scrap projects sing! It covers a wide range of articles reaching beyond the traditional 12x12 layout; mini albums, digi scrapping, art journaling and off the page creations all feature prominently. Traditional layouts are a big part of the magazine, but with a focus on adding creativity and techniques.

Detailed step-by-step tutorials sit alongside pages of truly inspirational scrapbooking projects from an international team of talented designers. It covers the whole range of styles from clean and simple, to shabby chic, to grungy – with something to appeal to every type of scrapper.

The fresh and modern design of this magazine lets the artwork really shine.


Each magazine will be $10.99 - however members and subscribers will be able to buy the magazines at the special price of $9.99 each!*

Yep that's right - you will be able to subscribe to these monthly magazines! If you are interested in subscribing, please email us on store@pages2scrap.com.au to regiuster your interest.

The March issues of both magazines are in store now, as well as a few back issues!

We look forward to seeing you in store soon!

~The Team at Pages 2 Scrap~

*No further discounts apply.

Page 2 Girls DT Project - March - Fiona


This month the Page 2 Girls are creating with WRMK Cotton Tail products.  Although this set is all about Easter and Spring, I knew I had to squeeze a baby welcome card out of that beautiful chequer paper!  Here are my projects for this month:

Card #1 - Welcome Baby

Cut Kraft cardstock 8” x 6”, score and fold.  Hand stitch a frame on your Kraft with white embroidery thread.   


Cut WRMK Cotton Tail Colour Me Plaid (pink side) to 5 ½” x 3 ½”.  Cut WRMK Cotton Tail Colour Me Plaid (chequer side) to 5 ½” x 2 ½”.  Cut WRMK Cotton Tail Sweet Spot to 5 ½” x approx ¾” (just enough to get the pink scallop).  Ink all three pieces with Victorian Velvet Distress Ink.  Attach all three pieces together, then attach this to Kraft base inside the embroidered frame.  Attach WRMK Cotton Tail Embossed Sticker – chick hatching.  Stamp ‘welcome baby’ from Darkroom Door All Occasions Set in Victorian Velvet Distress Ink.

Card #2 – Spring has Sprung

Cut Bazzill Walnut 8” x 6”, score, fold, ink edges in Gathered Twigs Distress Ink and set aside.  


Cut WRMK Cotton Tail In the Meadow (pattern side) 5 ¾” x 3 ¾” and ink edges with Shabby Shutters Distress Ink.  Cut WRMK Cotton Tail In the Meadow (blue side) 5 ¾” x 1 ½” and ink edges with Tumbled Glass Distress Ink.  Attach the blue piece to the patterned piece and machine stitch the edges and join.  Die cut a small dragonfly using Tim Holtz Fanciful Flight die & ink up the wings and body using Tumbled Glass, Broken China, Chipped Sapphire and Shabby Shutters Distress Inks and assemble.  Cut out ‘spring has sprung’ tag from WRMK Cotton Tail Sentiments and edge with Tumbled Glass Distress Ink.   


Attach some seam binding around blue section.  Tie a bow in some May Arts Burlap String.  Fold a piece of seam binding to make tails.  Attach pattern/blue panel to Walnut card base, attach seam binding tails & tag, attach WRMK Cotton Tail Crochet flower and string bow, and finally the butterfly.

Card #3 – Happy Easter

Cut WRMK Cotton Tail Color Me Plaid 2 ¾” x 10” and score at 5” on the wrong side & ½” away from this score line on the right side, and ink edges in Victorian Velvet Distress Ink.  


Cut WRMK Cotton Tail Sweet Spot (blue side) to 5 ¼” x 2 ¾” and ink edges in Tumbled Glass Distress Ink and attach to inside of card so the scallops are visible on the open side.  Punch or cut a circle in the front of the card.  Attach WRMK Cotton Tail Embossed Sticker ‘happy easter circle’ to inside so that it is visible through the circle hole.   


Attach the ½” section (between the two score lines) to the inner card (so it looks like a bound book).  Finally, attach some May Arts Burlap String around the fold.

Post-it Note Folder

Cut WRMK Cotton Tail Sweet Spot to 3 1/8” x 9” (measuring from the scallop edge).  From the short straight edge score at 3 3/8”, 3 ¾” and 7 ¾” and ink edges and folds with Victorian Velvet Distress Ink.   


Trim the tulip square image from WRMK Cotton Tail Sentiments (ink edges in Victorian Velvet Distress Ink) and mount on a piece of blue WRMK Cotton Tail In the Meadow (ink edges in Tumbled Glass Distress Ink) and attach to folder front.   


Attach the scallop flap to the base just at the fold and add some brads.  Attach the post-it note pad to inside. 

Thanks for popping in for a visit!
Fiona

Sunday, March 4, 2012

Page 2 Girls DT Project - February - Libby Morris


Wheeee it's February already! I hope you have been inspired to scrap some cards or try a mini album this year. Here are my samples for this month. I made two layouts, quite simple ones really. I much prefer 8.5 x 11 inch pages. I find that when I scrap 12 x 12 pages I just don't know where to stop. I love love love my Making Memories Slice and so I cut the little tricycle and the ladybug on the layouts with this fantastic easy to use machine.


The next thing I was inspired to make was this little heart keeper box. That tag says 'be strong'. I have had the box for ages so I covered it in patterned paper and stamped around the edges with embossing ink and sprinkled red powder and heat embossed the stamped hearts. 


This is the box from the front. I used those fantastic Melissa Francis jars of German Glass Glitter around the door frame for a bit of sparkly pop.


When you open the doors they reveal my heart.... ready 1..2..3.. ohhhhh lol
I made the heart from wool felt. I just cut out two heart shapes and hand sewed around the edges. Then I stuffed (I mean really stuffed the heart full off stuffing) the heart and glued it to the back of the shadow box. I do love this little box.

Next I took inspiration from a class I really enjoyed with the very talented mixed media artist,  Linda Baldock. All you need to do is to trot off to Bunnings or Mitre 10 and pick up a $10 roll of annealed wire. It's blackish wire which wont rust and is really quite easy to make into beautiful shapes to make yourself a necklace. It's really forgiving too. It doesn't look too rough like some shiny wire does after you've had a good chop at it. Especially while trying to make a nice round jump ring hee hee. 
If you have the chance my advice is to take as many classes as possible. I love learning new techniques and sometimes branching out into a bit of jewellery making can be very good for the old Mojo. Anyway, here is another dinky little book I made with contact prints and left over patterned paper. I have to say the papers from the My Minds Eye range are gorgeous. I went back and bought up big after I finished my DT projects.


How cute are the Crafty Secrets Vintage valentines?


Graphic 45 metal charm, Tim Holz metal number and Tim's clear crackle.


I hope you all had a fantastic time at the retreat. I missed it this time but I will be at the next one for sure. Thanks for all the support of the Pages 2 Girls... couldn't ask for a nicer bunch of ladies. I hope you get to pop into the shop really soon to see the inspirational wall. It's so full of amazing scrapping.

Lib x

Tuesday, February 28, 2012

LEAP YEAR SALE!


The 29th of February only comes once every 4 years! To celebrate we are having a special LEAP YEAR SALE!

ONE DAY ONLY!!

9AM TO 5PM 29TH FEBRUARY 2012!

Come in to Pages 2 Scrap to receive 29% off STOREWIDE*!!

Yep that's right - 29% OFF!! What an amazing bargain!!

Don't miss this opportunity to stock up on all your favourite items and spoil yourself with that special something that you've had your eye on!

See you soon!

~The Team at Pages 2 Scrap~

*Some items exluded. Sale does not include class fees, photo processing, furniture, retreat bookings, current laybys, Vagabond Machine, Eclipse Machine, Cruicut Machines, special orders, or anything from the clearance table. Offer available on in-stock items only. No further discounts apply.

Saturday, February 25, 2012

Page 2 Girls DT Project - February - Jane Clark

Hi everyone, Jane here and this time I have some lovie dovie cards to share with you. I was tickled pink when I received my delightful Design Team kit for February, filled with yummy My Minds Eye Love Me papers, Crafty Secrets heartwarming Vintage Cuts, love love love these!! Well anything vintage really!! In the kit was also one of my favourite brand of stamps to use with my Copics - the La La Land Stamps, this cute little girl is called 'Sweetheart Marci', adorable isn't she?!


Okay for this card I stamped 'Sweetheart Marci' on blender card and coloured her with the following Copic markers - Dress: B00, B02, B04 Hair: E42, E44, E47 Hearts: R22, R17 Skin: E50, E51. The paper doily is a Martha Stewart brand, I coloured the edges with Copic R17 and the white seam binding! I love how you can use these markers to make your embellishments match in colour!! I applied Glossy Accents to the hearts and hair clips.


I love the colours of this range of My Minds Eye papers and I thought I would keep to that colour scheme, so I coloured Sweetheart Marci just a little with watercolour pencils then stamp the dress on one of the papers, cut it out and glue it over the image. I stamped the heart section of the Marci twice on cream card, cut them out and joined them together to make a concertina heart piece, added bows of cream string on each end! The banners at the top was cut from one of the papers and once again I added bows of string. The Frame was cut using a Sizzix die and black ink was applied around the inner edges.

I fell in love with this bling embellishment as soon as I saw it!! Oh my goodness I NEED to buy some the next time I'm in the shop, they're gorgeous!!! Okay...moving onto the card LOL. I create this one using one of the Martha Stewart doilies, a banner cut from one of the papers, a sentiment cut from the Vintage Cuts (did I say I love these too!! he he) , a bow of seam binding and the beautiful papers!

With so many wonderful images on the Vintage Cuts sheet it's really hard to choose which one to use!! I have no excuse to give a card for Valentines day now! I think I could even give a wonderful friend any one of these card, don't you think? I created a little collage of embellishments under the image using a red bloomer, trimmed banner, postage image (from Vintage Cuts), white seam binding and a tiny white flower.

Well I hope I have got you in the mood of love and wanting to create some cards for the special people in your life, why not create a card for your Mum, sister, daughter?

Thanks again for looking, happy Valentine xx

Friday, February 24, 2012

Textured Impressions Card Class.


Hi everyone!

I'm finally back in the classroom this month after a bit of a break for the last couple of months! 

I'm here today to tell you about my upcoming cards class that's on TOMORROW and this coming Wednesday!

Textured Impressions Cards.


$30.00 (includes kit).

In this class you will make 4 gorgeous cards suitable for any occasion using the new Stamp & Emboss Textured Impressions set from Sizzix & Hero Arts.
 
This class will feature stamping, heat embossing, dry embossing (with the Cuttlebug) and lots of inking.

Dates:

(Why not stay on afterwards for our Scrap & Pizza Night?!).

OR


To book over the phone please call 1300 664 228 or follow the links above to book online. :)

I really hope to see you there!

~Sarah S~