Showing posts with label Design Team. Show all posts

Monday, April 30, 2012

Page 2 Girls DT Project - April - Fiona


Hi everyone.  This month we are creating with Little Yellow Bicycle ‘Paradise’ papers, and we are all featuring chipboard by WOW.


I chose WOW625 ‘Candles’.  I thought it would be fun to make a little set of gift cards – I had in mind that these would be lovely to give a new mum as a gift – now that she begins to be involved in lots of little birthday parties, she would have a go-to set of handmade cards to give that are age specific (with the candles representing the age).

I actually drew up a ‘plan’ to keep my pieces tidy (as I worked on all 5 cards at once).  The size was determined by the envelopes I found – they are just under 4” square.  You can see I laid my pieces over my plan to keep them neat while I was working on them.


I rounded my corners, and used my sewing machine to zig-zag over the edges of the paper pieces.  The chipboard was painted and sprayed with Tattered Angels glimmer mist, thought I’m not sure you can see it in the pictures.


The box is a simple box with a separate lid – instructions to make these are fairly accessible on the internet – but ensure your base (before you add on the amount of depth you want) is big enough to fit your cards and envelopes.  Also, when you make your lid, make it about 1/8” larger than your base measurement, so it fits neatly over the bottom of the box.  If you want to edge punch your lid (I used a Martha Steward edge punch) – make sure you do this before you attach your sides.  Here is a sample template – score/fold on the dotted lines, cut on the solid lines.


I added some beautiful ribbon and a beautiful little Resin Blossom by Kaiser.


Thanks for visiting!

Fiona


Monday, April 23, 2012

Page 2 Girls DT Projects - April - Jane Clark


Hi everyone, Jane here with the fantastic April kit!! I got to play with fabulous Little Yellow Bicycle Paradise collection of papers and this cute little Words or Whatever chipboard bird house set, happy, happy!!

To create this card I used the left over chipboard bird house packaging, I covered it with one of the papers and turned it into a house warming card, waste not want not I say. I used the Kaisercraft and Jenni Bowlin Studios embellishments at the top.


The second card I cut a panel out of one of the papers with the three trees and added a ready made bow and a pearl (love them) to each. I used a Martha Stewart punch to trim the pink paper and cut the words from one of the other papers.


My third card and my favourite, I cut a panel of three trees from the same paper as above but this time I turned it on it's side so it would look like branches. I coated the front of the birdhouse with Brilliance moonlight white ink pad and coloured the eves with a brown Copic marker, glued it together with a panel of the paper in between showing the heart.


Okay this time I made a necklace, once again I coated the front of the bird house with Moonlight white ink and coloured the other pieces with Copic markers, assembled them together using glue. I further decorated the piece using leaves, flowers and a sentiment cut from the papers.


I hope I have inspired you to do some creating with this fabulous kit!!

Thank you for looking,

cheers Jane.

Monday, April 16, 2012

Page 2 Girls DT Project - April - Jen


April DT Project - Jennifer Donegan
Hi all,
Here is my April DT project, I had so much fun making this little house! 
I simply LOVE the combination of hot pink and mint green in this paper range, and decided to complement it by using the dark mint on the door and the hot pink on the sides and under the eaves of the roof.


The little house is so versatile! You can put the door and windows where you like and paint them any colour at all to match any paper range or theme.
I couldn't believe my luck when I saw the stunning paper range we had to work with this month. I knew straight away what I wanted to do with it as I have had this cute little Twiddleybitz house kit in my "to do" pile for a while. 


Little Yellow Bicycle's "Paradise" range really fit the bill for what I wanted to create. The flower, tree and plant theme was exactly what I wanted for my back-to-nature little house. 


The little house opens to reveal space inside for pictures or a mini as desired. I plan on making some little tabbed folders and putting my April pics for Easter inside. 
See? Plenty of room for all those lovely pics! And even room for little memento’s or extra bits too! Wouldn’t this make such a wonderful little tooth fairy house? The child could put their tooth on a cushion inside and put the house on their bedside table, ready for the tooth fairy to swap for some money! 


All I did to create this little house is cover the Twiddleybitz Gingerbread House pieces in the paper before putting the house together. I decided I liked the “lace” look for the roof and created this with a punch then layered it. I painted the windows, doors and “sandstone” edges white and inked them with TH Distress Ink “Gathered Twigs”, I used the same colour to ink the edges of the entire project for that distressed, old world look. Once I finished covering the roof in the lace, I decided to do the sides of the roof too to make it look more complete. 
I cut out little “applique” bits, like the flower bunch on the back near the little blue bird. I used scrap dots to make this stand out from the project and create a 3D effect. 


Once I was finished, I lined the inside of the box and lid in the pretty hot pink paper and a few left over paper strips and cut some little “flowers” for the front window. I also glued on the cute resin roses, one on each side of the roof to break it up a bit, and I thought the little resin bow with the blingy little diamond in the middle would look cute in the center of the door.


I know you will enjoy this project as much as I did, so go ahead and give it a try!


Thanks so much for looking,
Jen = ) 

Saturday, April 14, 2012

Page 2 Girls DT Project- April- Kate


Kate's April DT Projects
April is one of my favourite months of the year because it is not only Easter (yummy chocolate & family time) but it is also my birthday month. The April kit the DT received was packed with gorgeous colours featuring the new and very versatile Little Yellow Bicycle (LYB) Paradise patterned papers. We were also very fortunate to showcase the beautiful intricately designed WOW chipboard. You will be very impressed if you make a WOW purchase (and Pages 2 Scrap have a HEAP of this in store), because it is fantastic quality and chipboard to suit any theme.

Untitled
I wanted to do a layout of myself since it is my birthday month after all!!

- You don't always need to include a title on your pages. You will know in yourself whether or not a title is 'needed' on your pages. Sometimes the photo tells the story on it's own without an obvious title. Sometimes a layout looks great to look at without the addition of a title. The way I see it, if you can by greeting cards with a 'blank message' inside, then surely you can produce a layout without a title. 
- To make the bunting, I tied a bow at each end of my string and hot glued each bow to either side of the photo. In addition, I hot glued my doily 'triangles' along the string as well. 
- I had my photo printed like that!! There are many applications you can use on iphones and android phones these days to edit your photos. I simply used a program to edit my photo and had it printed out. 
-Simple strips of patterned paper were used to create the background behind my photo. Kind of like a matt! One of the pieces I punched using a Martha Stewart Border Punch I purchased from Pages 2 Scrap. 
- Again, lots of paint, mist and stamping for my backgrounds. You can find a range of Kaiser paint, Glimmermist and stamps at Pages 2 Scrap. That is where I got all mine from! 
- Save empty toilet roll cores!! I use them to dip into paint to create 'circles' on my pages. 

Materials:

LYB Paradise patterned paper- Teal, too, simple pleasures, born to be wild.
Prima flowers
May arts burlap string
paper doily
Martha Steward ribbons 
Kaisercraft paint, stamps
Glimmermist


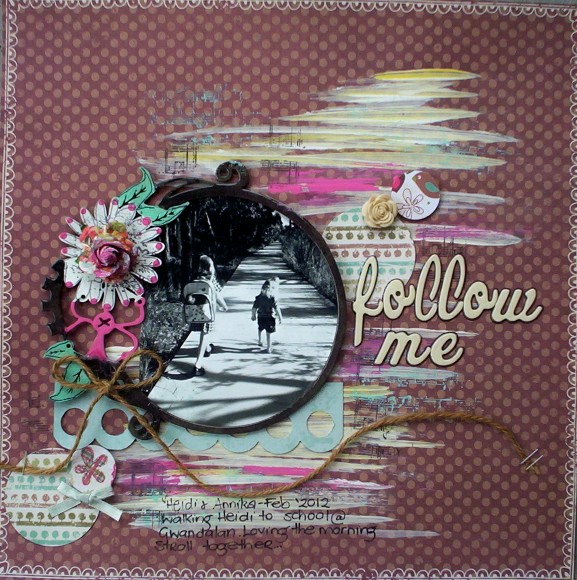
Follow Me

I really wanted to draw the eye in on this photo of my daughters walking to school. But I also wanted to create movement on my page like we are 'following' them up the path. I thought the WOW chipboard ALCHEMY CIRCLE FRAME LARGE would be perfect to frame this photo. The flowers and leaves on the chipboard really added that nature feel to represent the nature trail footpath we were walking along that morning. The painted base of my layout was to represent the 'path' they were on.

- Patterned paper can be a great base for a layout instead of cardstock. I always find papers without pictures on it and just a patterned work well. Especially this piece "Earthy Dots" with the border printed on it. It really helps to frame the layout. 
- I used normal acrylic paint to paint my chipboard, I also used Glimmer Glam, Glimmer Glaze and covered the majority of my chipboard with Glossy Accents. I glued a Prima flower to the centre of the flower in the chipboard, just to add dimension to that 'cluster'. 
- To add to the circular theme of the WOW chipboard frame, I used my circle punches to punch out patterned paper which I adhered to my layout with both DS tape and foam adhesive. 

Materials:
LYB Paradise- Earthy dots, petite pompoms, simple pleasures, born to be wild. 
ALCHEMY CIRCLE FRAME LARGE WOW chipboard
Martha Stewart Ribbons
Kaiser Resin Blossoms
May Arts Burlap String
staples
Kaiser paint, stamps
Glimmer glam, Glimmer glaze
American Crafts Thickers
Prima flower
Glossy Accents 


Keep you forever 

When I realised my daughter was wearing the same colour dress as this pretty Bazzil cardstock I just HAD to coordinate it all together to make this layout! The pretty images on the patterned papers in the LYB Paradise collection were perfect for outdoor photos as well, so I wanted to incorporate a natural, floral type 'spray' up the side of my photo. 

- I traced around a dinner plate to get the 'flower' type shape of the patterned paper. You never know what shaped objects in your kitchen or even your house that you can use as a stencil to trace around and then cut out for your layouts. 
- Once again, that toilet paper roll core came in handy for stamping on my Bazzil base. I find coloured cardstock (not neutrals) can be a bit daunting to use sometimes, however you can easily tone it down by adding texture with paints, misting and masks, stamping and even teaming it up like I have, with a busy patterned paper can help. 
- Arrange all your clusters first before adhering it to your page. Sometimes once you get it stuck down first, it might not look right or you might want to add something extra to it. So lay it all out first then start sticking!
- Outline your alphas to make them 'pop off the page'.
- I glued my resin blossom to my button to create a whole new embellishment. 

Materials:

Bazzil Intense Pink
LYB Paradise Patterned paper
Kaisercraft stamps (background and leaves), paint
Glimmermist
Prima flowers
American Craft Thickers
Jenni Bowlin Vintage Button
Jenni Bowlin Rhinestone Bow Cream
Kaiser Resin Blossom


Thank you so much for dropping by, I hope you feel a little inspired by these fabulous products. Make sure you check out the DT inspiration in store. 

~Kate

Monday, March 26, 2012

Page 2 Girls - DT Project - March - Libby


Hello again! Here are my March DT work. Firstly the layouts. For this first one I used the Crafters Workshop template and cut sections from the background kraft paper. The frame is surprise, surprise a Slice frame from the Grandma's Attic card. The banner is from the Bellissimo card. The heart... ah the heart is made from my new favourite product... Inky Antics honeycomb paper. So easy to use and fills the kitschy hole inside me lol


this 'BUN' page uses a lot of the DT paper pack from the We R Memory Keepers Cotton Tails range. I embossed some tags to go with the range and cut out some of the easter themed sentiments to go with these photos of Charlotte and her 'Bun' Some days I get the camera out and snap away even when the lawn is long and the kids are wearing holey trackies and no shoes.


Wouldn't you like to fly in my beautiful, my beautiful balloon?

ok I'll stop now.... the buppa balloon! 

By now, you will be used to me being quite unoriginal and stealing sourcing ideas from all sorts of places. Do you like PINTEREST? Oh my goodness PINTEREST is a place to save pictures of stuff you are inspired by or want to make, ideas for the home, clothes, crafts. You name it PINTEREST has it! It can make you late for work, just warning ya!

Anyway back to the balloon. I might have taken the inspiration from Martha Stewart! Click on the link to go directly to the how to page for paper mache balloons.

Frustrating little sucker this was! Only because the first one I made with a much smaller balloon. I hung it in a tree at the front of my house to dry (my neighbours are used to my lawn being used as a spray booth - covered in paint... strange things hanging in trees etc) I went back inside the house and began the ironing with a smug, self satisfied look on my face to be brought straight off my self imposed high horse with a very loud bang! The paper mache bit does take quite a long time to make and so imagine my disappointment when I opened the front door to find a wet soggy mess of mache on my lawn in a nondescript scrumpled mess. Boo hoo my balloon had burst, fallen off it's peg and out of the tree, simultaneously blowing an unrecoverable hole in the side of my beautiful, my beautiful balloon! (I dare you to get that song out of your head now lol)

So balloon Version II was much better. A bigger base balloon and more glue and more paper! 


So once made and dry I divided the balloon into sections with kraft strips. I found my local newsagent sells cheap packets of A4 paper in all sorts of colours and even kraft. I love using this paper for my Slice too. It's a bit easier to cut because of the much lower GSM (weight) and just one of those things I've worked out along the way. I've used Kaiser pearls and pearls from the 'by the metre' section at the shop. I used paper from the Dt pack range on the rosettes around the balloon and the Pink Paislee tissue paper in the basket. Speaking of the basket I think I got it as packaging a while ago. When I picked up my DT pack I did what I usually do and added Kaiser paint in the same colours to my shopping basket. Can never have enough paint! I used that to paint the balloon sections and basket and added ruffle puffly trim and tissue paper to the bottom of the balloon (to hide the dodgy hole I made at the bottom of the balloon) Little chicks (with bizarre straw hats mind you) popped in the basket as test pilots make up the passengers in my whimsical creation.


Nutty hey?


Tim Holz rosettes! I can't get enough just in case you hadn't noticed.


Thank you so much for the kind feedback on my DT work. Sometimes you step back from something you have spent hours on and realise you LOVE IT! It's so nice when even just one other person says they like it too.

I have to say wondering around the shop I do get all tingly and inspired by the fabulous new stuff, the DT work on display and the gorgeous classes. I hope to see you at one of the creative girls classes soon! I don't know about you but I can't wait for Donna Downey's classes. She is a true life artist and I have loved her work for so long. Tracey bringing her to Pages 2 Scrap is so exciting and I for one an truly greatful. See you there!

OK that's quite enough from me, thanks for looking, Lib x.


Monday, March 19, 2012

Page 2 Girls DT Project - March - Jane

Hi everyone, Jane here! Well this time I got to play with some yummy Easter products that are just the cutest!! I love the sentiments on the We R Memory Keepers Cotton Tales glitter paper, I think they could be used for other occasions and not just forEaster! I also found the Glitzin Glamour purple glitter glue to be fantastic!! I love that it had so much glitter in it, you don't get a patchy look at all!!

First card up - 'There's nobunny like you'. I just had to use this sentiment, just look at that adorable bunny!! I used the EK Success large, medium and small retro flower punches to create the flowers, they were held together with Cotton Tail glitter brads and Glitzin Glamour glue was applied around the brad, look how it sparkles!!  A Martha Stewart fond punch and green card was used for the leaves.


Card two - 'New Beginnings'. This card could be used for a new born or a Christening? The Cotton Tail paper already had that lovely scalloped edge and because the stickers are embossed there isn't much else you need to do~ In my DT kit came this fancy tissue paper (yellow) it's firm enough that you can tie a bow in it, love, love, love!


Card 3 - 'You Crack me Up! Another card that's just not for Easter! I have quite a few friends that crack me up! The chick and the three Easter eggs are all from the Cotton Tail embossed sticker sheet.

Card 4 - 'Cute as a Bunny'. This would make a lovely little baby girl card. The crocheted flower is adorable (mental note to myself - must get more). I cut the little bunny out of one of the papers and pleated that fabulous tissue paper down one side, this added colour and texture! A paper doily was used in the background.


I had so much fun creating with this months DT kit, I hope I have given you some inspiration not only for Easter!
Cheers and Thanks for looking, Jane

Monday, March 12, 2012

Page 2 Girls DT Project- March- Kate


Hoppy March!

And because it is a month before Easter it is the perfect opportunity to grab this lovely collection from We R Memory Keepers- Cotton Tail and team it up with some pretty coordinating embellishments to create some lovely Easter Off (Beyond) The Page pieces or layouts to compliment the season. 

I loved the soft pastels in this collection, it reminds me of all those pretty dyed eggs you see around this time of year, which is a big tradition for some families. Funnily enough, my projects I am showing you today don't have an Easter theme, so I will demonstrate to you that they can be used for non-Easter crafts. 


There's No Bunny Like You


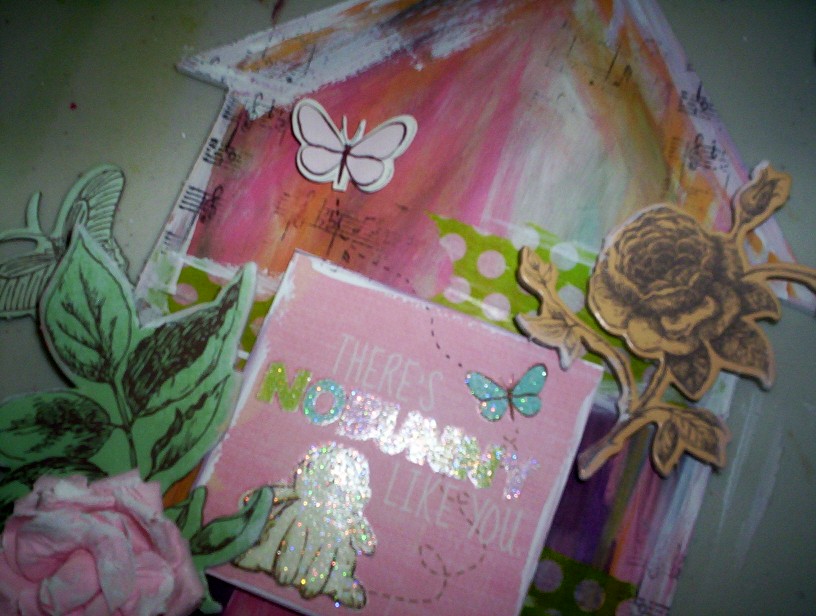
  • I have had this Kaisercraft Beyond the Page Arrow album for awhile. You could use any shape of MDF type board to make this. Pages 2 Scrap sells a range of Beyond the Page products and even strong chipboard could be used in lieu. I used ONE page from this package.


  • I raided my Kaisercraft paint and found a number of tubes to coordinate with the colours in the WRMK collection- Cotton Tail which I was using. I used my finger to spread different layers of paint over my board.


  • Using the Pink Paislee Daily Junque Printed sheets, I tore bits off it and glued them at various positions on the board.

  • I cut a sentiment from the Glitter Paper WRMK- Cotton Tail Sentiments sheet, I traced around the edge with white paint using my finger and then foam taped it for dimension to the centre of my board. At this stage, I used the rest of the white paint and my finger, once again to trace around the edges of the MDF.


  • When I was in Pages 2 Scrap for a shop, I browsed through the clearance baskets and came across a bargain with the Kaiser Secret Bird Society Chipboard. I knew it would match perfectly with these WRMK colours! So I also painted around the edges of each piece with white paint and my trusty finger again!! And adhered using foam tape to either side of the sentiment.

  • A perfect time to add in a WRMK Cotton Tail Embossed Sticker- Butterfly. I also used some Glitzin Glamour (Purple) on my finger and added some sparkle to my board. Optional: you could also do some stamping on your board like I did with my Kaiser Background Stamps.

  • And there you have it! Add some little extras like more WRMK Cotton Tail Embossed Stickers, Kaiser Paper Blooms, and some green Bloomers trim! All available at Pages 2 Scrap! Easy!

Materials

Kaiser Beyond the Page Arrow Album (1 piece from pack)
WRMK Cotton Tail Sentiments
WRMK Cotton Tail Embossed Stickers
Kaiser Paint
Kaiser paper blooms
Pink Paislee Daily Junque Printed Sheets
Glitzin Glamour Purple
Bloomers Trim
Kaiser Background Stamps

Layouts

I took the opportunity to do two layouts using the WRMK Cotton Tail range as well. 

Cute as a Bunny
- Use sentiments off the papers as titles on your layouts instead of alphas.
- Cut your own leaves from green papers.
- The WRMK embossed stickers leave a lovely embossed image on the backing paper of the sticker, use this as a flower as well!!

Materials

WRMK Die Cut Cotton Tail- Sweet Spot Patterned paper
paper doilys
Pink Paislee Daily Junque Printed Sheets
WRMK Cotton Tail Patterned Papers
WRMK Cotton Tail Embossed Stickers
Kaiser Secret Bird Society Chipboard
Kaiser Paper Blooms
Glitzin Glamour Purple
WRMK Cotton Tail- Glitter Brads
Kaiser Paint
WRMK Cotton Tail- Sentiments


Explore Bunnings

- Trace around flowers in your own stash, onto patterned paper and cut them out to make coordinating flowers for your projects. 
- Make masks by using paper doilys.
- Doodle little flowers on your page and put a brad through the centre. 

Materials

Bazzil Walnut Cardstock
Kaiser paint
Glimmer mist
Kaiser Secret Bird Society Chipboard
Bloomers Trim
Button
Staples
May Arts Burlap String Natural
WRMK Cotton Tail Embossed Stickers
AC Thicker Letter Stickers
WRMK Cotton Tail Glitter Brads
Pink Paislee Daily Junque Printed Sheets
WRMK Cotton Tail Patterned Papers


Thanks for stopping by! If you like anything I have used on my projects, pop into Pages 2 Scrap, the girls will point you in the direction of everything you need to create your own gorgeous pastel inspired projects.

Love Kate xo


Wednesday, March 7, 2012

Page 2 Girls DT Project - March - Fiona


This month the Page 2 Girls are creating with WRMK Cotton Tail products.  Although this set is all about Easter and Spring, I knew I had to squeeze a baby welcome card out of that beautiful chequer paper!  Here are my projects for this month:

Card #1 - Welcome Baby

Cut Kraft cardstock 8” x 6”, score and fold.  Hand stitch a frame on your Kraft with white embroidery thread.   


Cut WRMK Cotton Tail Colour Me Plaid (pink side) to 5 ½” x 3 ½”.  Cut WRMK Cotton Tail Colour Me Plaid (chequer side) to 5 ½” x 2 ½”.  Cut WRMK Cotton Tail Sweet Spot to 5 ½” x approx ¾” (just enough to get the pink scallop).  Ink all three pieces with Victorian Velvet Distress Ink.  Attach all three pieces together, then attach this to Kraft base inside the embroidered frame.  Attach WRMK Cotton Tail Embossed Sticker – chick hatching.  Stamp ‘welcome baby’ from Darkroom Door All Occasions Set in Victorian Velvet Distress Ink.

Card #2 – Spring has Sprung

Cut Bazzill Walnut 8” x 6”, score, fold, ink edges in Gathered Twigs Distress Ink and set aside.  


Cut WRMK Cotton Tail In the Meadow (pattern side) 5 ¾” x 3 ¾” and ink edges with Shabby Shutters Distress Ink.  Cut WRMK Cotton Tail In the Meadow (blue side) 5 ¾” x 1 ½” and ink edges with Tumbled Glass Distress Ink.  Attach the blue piece to the patterned piece and machine stitch the edges and join.  Die cut a small dragonfly using Tim Holtz Fanciful Flight die & ink up the wings and body using Tumbled Glass, Broken China, Chipped Sapphire and Shabby Shutters Distress Inks and assemble.  Cut out ‘spring has sprung’ tag from WRMK Cotton Tail Sentiments and edge with Tumbled Glass Distress Ink.   


Attach some seam binding around blue section.  Tie a bow in some May Arts Burlap String.  Fold a piece of seam binding to make tails.  Attach pattern/blue panel to Walnut card base, attach seam binding tails & tag, attach WRMK Cotton Tail Crochet flower and string bow, and finally the butterfly.

Card #3 – Happy Easter

Cut WRMK Cotton Tail Color Me Plaid 2 ¾” x 10” and score at 5” on the wrong side & ½” away from this score line on the right side, and ink edges in Victorian Velvet Distress Ink.  


Cut WRMK Cotton Tail Sweet Spot (blue side) to 5 ¼” x 2 ¾” and ink edges in Tumbled Glass Distress Ink and attach to inside of card so the scallops are visible on the open side.  Punch or cut a circle in the front of the card.  Attach WRMK Cotton Tail Embossed Sticker ‘happy easter circle’ to inside so that it is visible through the circle hole.   


Attach the ½” section (between the two score lines) to the inner card (so it looks like a bound book).  Finally, attach some May Arts Burlap String around the fold.

Post-it Note Folder

Cut WRMK Cotton Tail Sweet Spot to 3 1/8” x 9” (measuring from the scallop edge).  From the short straight edge score at 3 3/8”, 3 ¾” and 7 ¾” and ink edges and folds with Victorian Velvet Distress Ink.   


Trim the tulip square image from WRMK Cotton Tail Sentiments (ink edges in Victorian Velvet Distress Ink) and mount on a piece of blue WRMK Cotton Tail In the Meadow (ink edges in Tumbled Glass Distress Ink) and attach to folder front.   


Attach the scallop flap to the base just at the fold and add some brads.  Attach the post-it note pad to inside. 

Thanks for popping in for a visit!
Fiona